


YOMEDIA
ADSENSE
Flash after effects sự kết hợp chuyên nghiệp phần 4
100
lượt xem 16
download
lượt xem 16
download
 Download
Vui lòng tải xuống để xem tài liệu đầy đủ
Download
Vui lòng tải xuống để xem tài liệu đầy đủ
Tham khảo tài liệu 'flash after effects sự kết hợp chuyên nghiệp phần 4', công nghệ thông tin, đồ họa - thiết kế - flash phục vụ nhu cầu học tập, nghiên cứu và làm việc hiệu quả
AMBIENT/
Chủ đề:
Bình luận(0) Đăng nhập để gửi bình luận!
Lưu
Nội dung Text: Flash after effects sự kết hợp chuyên nghiệp phần 4
- Select Insert > New Symbol. Enter mcTextAnimation for the name and make 17. sure that the type is set to Movie Clip. Click OK. The Timeline for the new movie clip appears. Highlight the first blank keyframe 18. and select File > Import > Import to Stage to open the Import dialog box. Choose the SWF file you created in After Effects. Click Open. Figure 3.13: Import the SWF file created in After Effects into a movie clip in Flash. When the SWF file is imported into the movie clip, it appears as a series of 19. keyframes. Scrub through the Timeline to see the animation. Go to the Library. There is a graphic symbol for each letter in the text animation. Double-click on a graphic symbol and you will see that the letter form is a vector shape. Figure 3.14: The imported SWF file appears as a series of keyframes in the Timeline and each letter appears as a graphic symbol in the Library. Let’s add to this animation. First, insert a frame (F5) at frame 85 (Figure 3.15). 20. This will hold the text on the screen long enough to read it. Figure 3.15: Insert a frame (F5) at frame 85. This will extend the text’s time on the screen to allow the viewer to read it. 71 Exporting SWF Files
- Next, create a spiral-out sequence using the exact same keyframes just in 21. reverse order. To do this: 3 Select the keyframes from frames 1 to 45. 3 Select Edit > Timeline > Copy Frames. 3 Click on the empty cell at frame 86. Select Edit > Timeline > Paste Frames. 3 Highlight the pasted keyframes. Select Modify > Timeline > Reverse Frames. Figure 3.16: Create a spiral-out sequence by copying and pasting the frames at the end of the Timeline. Then reverse the frame sequence. Close out of the movie clip and return to the root Timeline. Click on the New 22. Layer icon at the bottom of the Timeline panel. Rename the layer to text. Click and drag the mcTextAnimation symbol from the Library to the Stage. 23. Go to the Properties panel and set the X and Y position to 0 (Figure 3.17). 24. This aligns the registration point to the upper left corner of the Stage. Since the composition in After Effects was set to the same dimensions as the Flash Stage, the text will be positioned in the center of the Flash movie. Figure 3.17: Set the X and Y positions to 0 to center the text on the Stage. Save and publish your movie. The text spirals in and then out. You may want 25. to add a “stop” action on the last frame of the text movie clip. Note that the final file size for the SWF file is around 8 KB. That is even smaller than the text animation SWF file exported from After Effects (9 KB). Flash does provide better compression than After Effects when exporting SWF files. Creating and exporting complex text animation as a SWF file is rather easy to do in After Effects. This exercise introduced you to text layers and animation presets. There is much more that you can do with these. In fact, Chapter 5 devotes itself entirely to creating and animating text in After Effects. 72 Chapter 3: From After Effects to Flash
- Exercise 2: Export Illustrator Animation as Flash SWF Let’s export one more SWF file from After Effects. For this exercise, you will use footage created in Adobe Illustrator to export a SWF file for the Flash Player. The final SWF file will only contain vector art, keeping the file size small. Create a new project in Adobe After Effects. 1. Import the footage file. Double-click inside the Project panel. This opens the 2. Import File dialog box. Locate the SpringLogo.ai file inside the 01_Footage folder in 01_SWF/Chapter_03. Select the file. Figure 3.18: Import the Adobe Illustrator file into the Project panel. Before you import, choose Composition – Cropped Layers as the Import type 3. in the Import dialog box. Each layer will import with their original dimensions. This will make it easier to animate in the Comp Window. Click OK. Double-click on the SpringLogo composition in the Project panel to open 4. it in the Timeline and Composition panels. Select Composition > Composition Settings. Make sure the duration of the 5. composition is set to five seconds (05:00). Click OK. If you added more time to the original duration, you will need to zoom out 6. the Timeline to view the entire composition. To do this, click and drag the Zoom slider at the bottom of the Timeline all the way to the left. Figure 3.19: Zoom out to view the entire composition’s Timeline. Each layer’s colored bar needs to extend to the end of the Timeline. Re-trim the 7. Out Point for each layer by clicking and dragging it to the end (Figure 3.20). 73 Exporting SWF Files
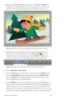
- Figure 3.20: Re-trim each layer’s Out Point to the end of the Timeline. Let’s animate the ladybug. Go to the Comp Window and click and drag the 8. ladybug to the lower left side of the Comp Window. This will be the starting point for its animation (Figure 3.21). Figure 3.21: Reposition the ladybug to the bottom left corner in the Comp Window. Motion Sketch In addition to manually setting keyframes, After Effects provides a Motion Sketch tool that records a motion path as you draw in the Comp Window. This is another great time saver in terms of animation. Select Window > Motion Sketch. This opens the Motion Sketch panel in the 9. bottom right corner of the Workspace. Set the Smoothing to 10. This reduces the number of keyframes recorded and 10. produces a much smoother motion path. The higher the number, the smoother the motion. Don’t set this value too high or the tool will not accurately preserve the motion path drawn. Ten is a good number to start with. 74 Chapter 3: From After Effects to Flash
- Make sure both checkboxes are checked for Show Wireframe and Show 11. Background. This makes the drawing much easier to do, as you can see the layers you are working with. Click on Start Capture to activate the tool. It doesn’t start recording keyframes 12. until you click and drag a layer in the Comp Window. Figure 3.22: The Motion Sketch settings control the smoothness of the motion path. The goal of this animation is to have the ladybug animate over the title and 13. end at the top of the “i” in the word Spring. Click and drag the ladybug in the Comp Window. The Motion Sketch tool records the keyframes as you move the cursor. Release the mouse button when you are done. This stops the tool from recording. Figure 3.23: The Motion Sketch records keyframes for the motion path drawn. Click on the RAM Preview button. Save your project. 14. 75 Exporting SWF Files
- Let’s orient the ladybug to follow the path. Select Layer > Transform > 15. Auto-Orient. In the Auto-Orientation dialog box, select the option Orient Along Path. Click OK. Figure 3.24: Orient the ladybug to follow along the path. You can adjust the recorded motion path in the Comp Window and Timeline 16. panel. Select the layer in the Timeline and press P on the keyboard to open the Position property. The recorded keyframes appear in the Timeline section. Figure 3.25: Open the Position property in the Timeline to view the recorded keyframes. Click on the RAM Preview button. Save your project. 17. Now that the animation is done, it is time to export the composition. Select 18. File > Export > Adobe Flash (SWF). This opens the Save File As dialog box. Save the SWF file to the 01_SWF folder in Chapter_03. The SWF Settings dialog box appears. In the Images area, set After Effects 19. to Ignore Unsupported Features. Since the footage is an Adobe Illustrator file and does not contain any gradients, all the layers will export as vectors. Click OK. Locate the exported Flash SWF file. Double-click on it to play the 20. animation in the Flash Player. Notice that After Effects also saves a report HTML file (SpringLogoR.html) within the same folder as the Flash SWF file. This file contains a link to the Flash SWF file and allows you to play the animation in a browser window. This completes the exercise. To summarize, you can create vector animation directly in After Effects and export it as a Flash SWF file without using Flash at all. This exercise also introduced the Motion Sketch tool, which can save time on animating layers. Flash does not have a tool like this. In order to create a similar motion path, you would need to create a motion guide and attach a layer to it. 76 Chapter 3: From After Effects to Flash
- Exporting PNG Image Sequences An alternative to exporting a Flash SWF file is to export a PNG image sequence. The raster images can then be imported into Flash as a frame-based animation. Even though the compression is quite good in a PNG file, the image size and the duration of the image sequence needs to be taken into consideration. This exercise provides a step-by-step tutorial on exporting a PNG sequence from After Effects to Flash. To see an example of what you will build, locate and play Duel.swf in the Completed folder inside the 02_PNG folder in Chapter_03. Why use After Effects to create the character animation instead of Flash? Figure 3.26: The finished PNG Image Sequence in Flash. One awesome new tool that After Effects has over Flash is the Puppet tool. Introduced in After Effects CS3, this tool allows you to easily create natural motion by deforming parts of a layer. We’ll take a brief look at how this tool was used for this exercise. Chapter 7 provides more in depth tutorials on character animation using the Puppet tool. Open Swashbuckler.aep inside the 02_PNG folder in Chapter_03. 1. The Project panel contains a Flash SWF file and a composition. The character 2. originated in Flash as a one-frame, static vector image. The Puppet tool turns any raster or vector image into a kind of simulated marionette. For this exercise, the “strings” of the marionette were attached using the Puppet Pin Tool . Deform points were added at the shoulders, elbows, wrist, torso, knees, and feet (Figure 3.27). The position of each deform point was animated over time. Why export this as a PNG sequence? Even though the artwork is vector-based, with the Puppet effect applied, the layer will only export as a raster image. This would create a large SWF file. PNGs provide a better, much smaller solution. 77 Exporting PNG Image Sequences
- Figure 3.27: The Puppet tool simulates a marionette. Deform pins placed at strategic locations allow you to create realistic, natural movement over time. Before you save the PNG image sequence, crop the Comp Window to help 3. reduce the file size for each exported image. Click on the Region of Interest button at the bottom of the Composition panel. The region of interest is the area that is previewed in the Comp Window. Click and drag in the Comp Window to create a smaller region of interest. 4. Scrub through the Timeline to make sure the character remains inside the area as he animates. Use the corner handles to resize the region if necessary. Figure 3.28: Reduce the region of interest. Creating a smaller region requires less processing power and helps improve the RAM preview. 78 Chapter 3: From After Effects to Flash
- Select Composition > Crop Comp to Region of Interest. The size of the Comp 5. Window is reduced to the dimensions of the region of interest bounding box. Select Composition > Make Movie. 6. Click on Lossless next to Output Module. Set the Format to PNG Sequence. 7. Under the Video Output section, set the channels to RGB + Alpha. You need an alpha channel to composite the sequence properly in Flash. Figure 3.29: Set the PNG files to render with an alpha channel. Click on Output To. In the dialog box that appears create a new folder in the 8. 02_PNG folder in Chapter_03. Name it PNG Sequence. Click Open. Click Save. It is always a good idea to store image sequences in their own folder. Figure 3.30: Create a new folder to save the PNG files into. Click the Render button. Save your project. 9. Locate the PNG Sequence folder. It now contains thirty PNG files each with a 10. sequentially numbered file name. These files will be imported into a movie clip in Flash. Cropping the Comp Window helps reduce the overall file size. Figure 3.31: The rendered PNG image sequence contains sequentially numbered file names that Flash can recognize. 79 Exporting PNG Image Sequences
- Let’s move to Flash. Double-click on Duel.fla in the 02_PNG folder to 11. open the file in Flash. It contains two layers: Foreground and Background. The artwork was created in Photoshop and imported as bitmap images. Figure 3.32: The Flash file contains the scene for the swashbuckler. Select Insert > New Symbol. Enter mcSwashbuckler for the name and make 12. sure that the type is set to Movie Clip. Click OK. The Timeline for the new movie clip appears. Highlight the first blank keyframe 13. and select File > Import > Import to Stage to open the Import dialog box. Choose the first image in the PNG sequence (Duel_00000). Click Open. Flash recognizes the file naming convention as a sequence and prompts you 14. to import the entire sequence. Click Yes. Figure 3.33: Flash prompts you to import the entire image sequence. The PNG image sequence appears as a series of keyframes in the movie clip. 15. Scrub through the Timeline to see the animation. Go to the Library. There is a bitmap icon for each image in the sequence. 80 Chapter 3: From After Effects to Flash
- You are going to use multiple instances of this movie clip on the Flash Stage. To 16. maintain a small SWF file size, convert each bitmap image in the Timeline into a graphic symbol. By doing this, Flash will only store the bitmap images once in the final published file. Organize the Library better. Create two new folders; one folder holds the 17. imported PNG sequence and the other holds the graphic symbols. Click on the New Layer icon at the bottom of the Timeline panel. Rename 18. the layer to Swashbuckler. Position the new layer in between the Foreground and Background layers. Click and drag the mcSwashbuckler symbol from the Library to the Stage. 19. Let’s give the character a drop shadow to anchor him in the scene. Click on the swashbuckler and select Edit > Duplicate. A copy appears on 20. top of the original movie clip. Click and move the duplicate movie clip off the original so that you will be able to see the drop shadow effect more clearly. Figure 3.34: Duplicate the movie clip. Make sure the duplicate movie clip is still selected. Go to the Properties panel 21. and click on the Filters tab. Click on the “+” to add a new filter to the instance. Select Drop Shadow from the popup menu. Click on the checkbox for Hide Object. Adjust the Strength from 100% to 22. 70%. Change the blur factor from 5 to 10 for Blur X and Y. These settings will help make the shadow more convincing in illustrating depth. Skew the drop shadow horizontally to add perspective. The Skew tool is 23. found in the Transform panel. Click on the radio button for Skew and enter 45.0° in the Skew Horizontally text box. 81 Exporting PNG Image Sequences
- Select Modify > Transform > Flip Vertical. This will flip the drop shadow so 24. that it acts more like a cast shadow for the swashbuckler. Select the Free Transform tool. Position the cursor over the top-middle handle. 25. Click and drag down to scale the drop shadow vertically. Position the drop shadow at the base of the swashbuckler. You may need to 26. rotate the shadow to align better with his feet (Figure 3.35). Figure 3.35: Position and rotate the drop shadow to align with the swashbuckler. Select Modify > Arrange > Send to Back to adjust the layer stacking order. 27. The drop shadow is now underneath the swashbuckler. Select Control > Test Movie. As the movie clip of the swashbuckler animates, 28. the shadow mimics the movements. Save your Flash file. Obviously the raster PNG images do inflate the published file size (575 KB) more that if they were vector shapes. Duplicate the swashbuckler and flip the copy horizontally. Now he has someone to duel against. Adjust the colors of the copy using the Filters tab. Think about animating the position of each character. Figure 3.36: Add another swashbuckler movie clip instance to the Stage. 82 Chapter 3: From After Effects to Flash
- Working with Flash Video (FLV) Flash Video is everywhere on the Web. It provides great image quality and compression. Flash can encode a video from After Effects in the FLV format. When you import a video into Flash, you have a couple of options to choose from. You can either embed the video directly on the Timeline or load it externally as a separate file. Which option is the best to use? That all depends on the video and what you need it for. Table 3.1 offers some suggestions. Table 3.1: Embed the Video or Load It Externally? Video / Purpose Embed External 5 seconds or under with no audio X Used to trace frames for rotoscope animation X Used for interface interactivity (buttons, preloaders) X Longer than 5 seconds with audio X Used for instructional training X Used in conjunction with cue points X Exercise 1: Import Video Wizard There are also a couple of ways you can import video into Flash. Let’s start by using the Import Video Wizard. This tool walks you through a series of screens to create a FLV playback component that contains a link to the FLV video file and controls that allow you to interact with the playback. Open the 03_FLV folder in the Chapter_03 folder. Open 01_ImportWizard.fla 1. in Flash. The file contains two layers: Video and Background. Select the blank keyframe on frame 1 of the Video layer (Figure 3.37). Figure 3.37: Select the blank keyframe on the Video layer. 83 Working with Flash Video (FLV)
- Select File > Import > Import Video. This opens the Import Video Wizard. 2. The wizard first asks you to locate the video file. Make sure On Your Computer 3. is selected. Click Browse. In the Open dialog box, locate the DeepBlueTitle.mov in the Movies folder inside the 03_FLV folder. Select it. Click Open. Figure 3.38: Locate the video to import on your computer. The path name to the file appears in the File Path field. Click Next. 4. For the deployment options, select Progressive Download From a Web Server. 5. This option allows you to stream video using HTTP streaming. Flash will create an external FLV file. That file needs to be uploaded to the server along with the SWF file. Click Next to continue. Figure 3.39: Select Progressive Download as the deployment option. For the video encoding, select Flash 8 – High Quality (700 kbps) from the 6. Encoding Profile popup menu. Flash has several encoding profiles for different Flash Player versions and different download speeds. The higher the quality, the larger the file size. Experiment with different profiles to determine which one provides the best solution for your Flash project. Figure 3.40: Select the encoding profile for the video. The video dimensions are 720 x 480 pixels. This is quite large for a Flash Video 7. file. Common FLV dimensions are 360 x 240, 320 x 240, 240 x 180, and 120 x 90. Click on the Crop and Resize tab. Check the Resize checkbox. Enter 360 in the Width field and 240 in the Height field. This will scale the rendered Flash Video (FLV) file and help reduce the overall file size. Click Next to continue. 84 Chapter 3: From After Effects to Flash
- Figure 3.41: Resize the video to 360 x 240 to reduce file size. The skin provides video controls such as play, stop, and seek. Select SkinUnder- 8. PlaySeekStop.swf from the Skin popup menu. Notice that the skin is a SWF file. Flash will save a copy of this file to the same folder it saves the FLV file to. Figure 3.42: Select the video controls. Flash refers to this as a Skin. Click Next to continue. Review the settings for the imported video file. Click 9. Finish to encode the video. The resulting FLV file will be saved to the same folder as the Flash FLA file. When Flash is done encoding the video, a black box with the selected skin 10. appears on the Flash Stage. The black box is a FLV playback video component. In order to see the video, you need to publish the Flash file. Select Control > Test Movie. This completes the exercise on using the 11. Import Video Wizard. The next exercise loads FLV files using ActionScript. Figure 3.43: Flash saves three files to the same folder as the FLA file. These three files need to be uploaded together to a server in order to play on the Web. 85 Working with Flash Video (FLV)
- Exercise 2: Loading Video Using ActionScript The Import Video Wizard provides an easy method for creating and importing video files into Flash. ActionScript offers another way to load Flash Video. Unlike the Import Video Wizard, ActionScript does not create the actual FLV file; it can only load FLVs and control their playback. You must encode the video file in the FLV format using either After Effects, Flash Import Video Wizard, or the Adobe Flash CS3 Video Encoder prior to loading it with ActionScript. The code that imports the FLV file follows a strict procedure that first connects to the FLV file and then streams its content into a Video object added to the Flash Stage (Figure 3.44). Net Net Connection Stream links to FLV transfers data Video Object Figure 3.44: Loading FLV files using ActionScript. Open 02_VideoActionScript.fla located in the 03_FLV folder in Chapter_03. 1. The project is already assembled using three layers: buttons, TV, and Screen. Figure 3.45: Open 02_VideoActionScript.fla. It contains all the artwork you need. 86 Chapter 3: From After Effects to Flash
- Let’s deconstruct how the imagery was created in Photoshop. The photo of the vintage television set has a transparent hole where the actual picture tube is. Using the Pen tool, the shape of the picture tube was traced, selected and deleted. The Screen layer holds a PNG image of reflective glass. Its opacity was set to 50% in Photoshop. The video will play underneath both layers giving the illusion of a television broadcast. Figure 3.46: The television set is made up of two PNG images. The imported video will playback underneath the two layers adding to the illusion of a television broadcast. The buttons layer holds a movie clip instance. The panel artwork was created in Photoshop and imported as a PNG file. A button symbol was created in Flash and placed over each thumbnail image. Each button has a unique instance name that can be referenced through ActionScript. When the buttons are clicked, Flash will load a specific FLV file into a Video object. Figure 3.47: The buttons are invisible button symbols created in Flash. Each has a unique instance name that will load a specific FLV file when clicked on. The movie clip also contains an animation of the panel moving up and down. A mask layer is used to hide the panel when not in use. Frame labels are assigned to reference specific frames through code (Figure 3.48). For example, each time a thumbnail image is clicked, ActionScript instructs this movie clip to jump to the frame labeled “close” and play the frames that follow it. 87 Working with Flash Video (FLV)
- Figure 3.48: The movie clip contains an animation. Frame labels are used to identify the movement of the video panel. Where are the videos? They are kept external from this Flash file. Locate the FLV folder inside the 03_FLV folder. It contains three FLV files that were rendered out of After Effects through the Render Queue. These files will be loaded externally into Flash using ActionScript. Now that you have an idea of how the Flash file is set up, let’s start programming. On the main Timeline add a new layer labeled actions. Select the blank 2. keyframe in Frame 1 and open the Actions panel. The first step is to create a NetConnection object. This object links, or provides 3. directions, to the FLV file. Null is used for the connection name since you are accessing the FLV files locally from your hard drive. Finally, create a NetStream object to control the playback of the video. In order to stream the data correctly, the NetConnection is passed into the NetStream. Enter the following code: // create a NetConnection var vConnection:NetConnection = new NetConnection(); vConnection.connect(null); // create a NetStream var vStream:NetStream = new NetStream(vConnection); The Flash Player receives descriptive information embedded in the FLV file 4. being played. This information is referred to as metadata. It could contain the title, author, comments, etc. You need to set up an object that will listen for this metadata information. This object will be linked to the NetStream object since that is what is transferring the data into Flash. Enter the following code in the Actions panel. Add it after the code you entered in Step 3. The code vStream.client attaches the metadata object to the NetStream object. The metadata listener calls a function named onMetaData. This function will be added later. 88 Chapter 3: From After Effects to Flash
- // create a metaData listener var metaDataListener:Object = new Object(); metaDataListener.onMetaData = onMetaData; vStream.client = metaDataListener; The next step is to create a Video Display Object that will hold the loaded FLV 5. file. The code creates a new object with a size of 320 x 240 pixels. The horizontal and vertical position is set to align the Video object with the television screen. The statement, addChild(myVideo), draws the object on the Flash Stage. To affect the layer stacking order, use the setChildIndex command. A value of 0 sets the object at the bottom, underneath all other layers. Finally, the NetStream object is attached to the Video object. Enter the following code: // create a video display object var myVideo:Video = new Video(320, 240); // set the location of the video myVideo.x = 116; myVideo.y = 46; addChild(myVideo); // set the depth of the video to be underneath everything setChildIndex(myVideo, 0); // attach the NetStream to the video object myVideo.attachNetStream(vStream); Once the NetConnection, NetStream, and Video objects are in place, define 6. all variables and event listeners. The variable named dropStatus determines whether the video panel opens or closes on the Stage. The event listeners are attached to the buttons on the thumbnail images. Enter the following code: // define popUp menu variable var dropStatus:Boolean = true; // add Event Listeners for buttons infoPop_mc.popUp_btn.addEventListener(MouseEvent.CLICK, OpenOrClose); infoPop_mc.info_mc.image1.addEventListener(MouseEvent.CLICK, playVideo1); infoPop_mc.info_mc.image2.addEventListener(MouseEvent.CLICK, playVideo2); infoPop_mc.info_mc.image3.addEventListener(MouseEvent.CLICK, playVideo3); The last step is to add the Event Handlers. They are functions that execute 7. statements when a specific event is “heard” by the event listeners. For this exercise you will add five handlers, one for each button event listener and a handler for the metaDataListener. The code vStream.play(“FLV file name”) plays the video in the Video object. Enter the code on the following page. Select Control > Test Movie. Click on a thumbnail to load a video. ActionScript 8. provides a lot more control over video that will be discussed in the next chapter. 89 Working with Flash Video (FLV)
- // add Event Handlers to respond to the buttons function OpenOrClose(event:MouseEvent){ if(!dropStatus) { dropStatus = true; infoPop_mc.gotoAndPlay(“open”); }else{ dropStatus = false; infoPop_mc.gotoAndPlay(“close”); } } function playVideo1(event:MouseEvent){ vStream.play(“FLV/Video1.flv”); } function playVideo2(event:MouseEvent){ vStream.play(“FLV/Video2.flv”); } function playVideo3(event:MouseEvent){ vStream.play(“FLV/Video3.flv”); } // add Event Handler to respond to the metadata loading function onMetaData(data:Object){ dropStatus = false; infoPop_mc.gotoAndPlay(“close”); } stop(); Summary This completes the chapter. As you can see, there are several different options available to you when exporting After Effects files to Flash. No matter which option you choose, always optimize the image size and the video encoding to maintain a respectable file size for Web delivery. Exporting vector art from After Effects creates small file sizes but does have its limitations. Rasterized content should be exported as either an image sequence or Flash Video. When working with Flash Video you can either import the video into an FLV Playback component or stream the video into a Video Display object using ActionScript. Which is better? Using the FLV Playback component can be quite useful and a big time saver in most cases. It provides a lot of functionality with little or no coding effort on your part. If there is a very strict requirement in terms of file size, creating the Video Display object is better than using components for a number of reasons. First, it creates a lower file size. Components tend to include extra features that you may never actually use. Secondly, if you want to make a video player with more customizable features than what the component includes, you can build them using ActionScript and in the process, learn more about programming. 90 Chapter 3: From After Effects to Flash
ADSENSE
CÓ THỂ BẠN MUỐN DOWNLOAD


Thêm tài liệu vào bộ sưu tập có sẵn:

Báo xấu
LAVA
AANETWORK
TRỢ GIÚP
HỖ TRỢ KHÁCH HÀNG
Theo dõi chúng tôi


Chịu trách nhiệm nội dung:
Nguyễn Công Hà - Giám đốc Công ty TNHH TÀI LIỆU TRỰC TUYẾN VI NA
LIÊN HỆ
Địa chỉ: P402, 54A Nơ Trang Long, Phường 14, Q.Bình Thạnh, TP.HCM
Hotline: 093 303 0098
Email: support@tailieu.vn
Giấy phép Mạng Xã Hội số: 670/GP-BTTTT cấp ngày 30/11/2015 Copyright © 2022-2032 TaiLieu.VN. All rights reserved.

