


PHP: The Good Parts: Delivering the Best of PHP- P7
lượt xem 24
download
 Download
Vui lòng tải xuống để xem tài liệu đầy đủ
Download
Vui lòng tải xuống để xem tài liệu đầy đủ
PHP: The Good Parts: Delivering the Best of PHP- P7: Vượt qua tất cả các hype về PHP và thâm nhập vào sức mạnh thực sự của ngôn ngữ này. Cuốn sách này khám phá những tính năng hữu ích nhất của PHP và làm thế nào họ có thể đẩy nhanh quá trình phát triển web, và giải thích lý do tại sao thường được sử dụng PHP yếu tố thường được sử dụng sai hoặc misapplied. Bạn sẽ tìm hiểu thêm phần nào sức mạnh để lập trình hướng đối tượng, và làm thế nào để sử dụng...
Bình luận(0) Đăng nhập để gửi bình luận!
Nội dung Text: PHP: The Good Parts: Delivering the Best of PHP- P7
- $this->SetFont('','B'); //Header // make an array for the column widths $w=array(85,40,15); // send the headers to the PDF document for($i=0;$iCell($w[$i],7,$header[$i],1,0,'C',1); $this->Ln(); //Color and font restoration $this->SetFillColor(175); $this->SetTextColor(0); $this->SetFont(''); //now spool out the data from the $data array $fill=true; // used to alternate row color backgrounds foreach($data as $row) { $this->Cell($w[0],6,$row[0],'LR',0,'L',$fill); // set colors to show a URL style link $this->SetTextColor(0,0,255); $this->SetFont('', 'U'); $this->Cell($w[1],6,$row[1],'LR',0,'L',$fill, 'http://www.oreilly.com'); // restore normal color settings $this->SetTextColor(0); $this->SetFont(''); $this->Cell($w[2],6,$row[2],'LR',0,'C',$fill); $this->Ln(); // flips from true to false and vise versa $fill =! $fill; } $this->Cell(array_sum($w),0,'','T'); } } //connect to database $connection = mysql_connect("localhost","user", "password"); $db = "library"; mysql_select_db($db, $connection) or die( "Could not open $db database"); $sql = 'SELECT * FROM books ORDER BY pub_year'; $result = mysql_query($sql, $connection) or die( "Could not execute sql: $sql"); // build the data array from the database records. While($row = mysql_fetch_array($result)) { $data[] = array($row['title'], $row['ISBN'], $row['pub_year'] ); } // start and build the PDF document $pdf = new PDF(); //Column titles PDF Generation | 103
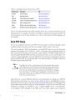
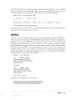
- $header=array('Book Title','ISBN','Year'); $pdf->SetFont('Arial','',14); $pdf->AddPage(); // call the table creation method $pdf->BuildTable($header,$data); $pdf->Output(); In this code, we use the database connection and build two arrays to send to the BuildTable() custom method of this extended class. Inside the BuildTable() method, we set colors and font attributes for the table header, then send out the headers based on the first array passed in. An array called $w (for width) sets the column widths and is used in the calls to the cell() methods. After the table header is sent out, we use the $data array that contains the database information and walk through that array with a foreach loop. Notice here that the cell() method uses LR for its border parameter. This refers to borders on the left and right of the cell in question, thus effectively adding the sides to the table rows. We also add a URL link to the second column just to show that it can be done in connection with the table row construction. Finally, we use a $fill variable to flip back and forth so that the background color will alternate as the table is constructed row by row. The final call to the cell() method in this BuildTable() method draws the bottom of the table and closes off the columns. The result of executing this code in a browser is shown in Figure 8-11. Figure 8-11. Table data taken from MySQL placed in a dynamic PDF 104 | Chapter 8: PHP and Friends
- Graphical Reports Generation JPGraph is used to make graphical statistical reports like bar charts and pie charts. It is an object-oriented code library, so by now it should be fairly straightforward for you to use. As before, you access this library with a require statement. Typically, a graphical report will ask the user for input in order to build the report. This is information like the date range that the report will cover, the sorting order of the data, and so on. In our samples, however, we will simply provide arrays with preset values to make them a little easier to review. Pie Charts The first sample graph that we will look at is a pie chart. In the following listing you will see an array of data to be plotted on the chart assigned to a variable called $data; this is the data that would normally be provided by a data entry page, a select statement from a database, or a combination of both. We can do this after we bring in the ap- propriate libraries for the chart that we are about to build. JPGraph is a little different than other libraries in the sense that there is a basic library required by all graphs being generated, as well as individual specialized libraries, or sublibraries, that are more suited to each graph type. In this case, we use the jpgraph_pie.php file because we are creating a pie chart. After we reference the correct libraries and provide the raw data, we instantiate the $piechart class from the Pie Graph object and pass two numbers representing the width and height of the chart to the constructor. Then we simply start using the methods available to us to build the chart. We can control the look of the title of the chart by setting the title text, its font, and its colors. Then we instantiate an object called $pPlot, which is a rendition of the pie shape itself and how it is sliced up based on the $data array we built earlier. Next, we can describe the labels that will accompany each slice of the pie. Finally, we add the plotted chart onto the graph with the Add method, and display the whole thing with the Stroke method: include ("../../jpgraph/jpgraph.php"); include ("../../jpgraph/jpgraph_pie.php"); $data = array(12, 15, 23, 18, 5); // Create the Pie Graph. $piechart = new PieGraph(300,350); // Set a title for the plot $piechart->title->Set("Sample Pie Chart"); $piechart->title->SetFont(FF_VERDANA,FS_BOLD,12); $piechart->title->SetColor("darkblue"); $piechart->legend->Pos(0.1,0.2); Graphical Reports Generation | 105
- // Create pie plot $pPlot = new PiePlot($data); $pPlot->SetCenter(0.5,0.55); $pPlot->SetSize(0.3); // Setup the labels $pPlot->SetLabelType(PIE_VALUE_PER); $pPlot->value->Show(); $pPlot->value->SetFont(FF_ARIAL,FS_NORMAL,9); $pPlot->value->SetFormat('%2.1f%%'); // Add and stroke $piechart->Add($pPlot); $piechart->Stroke(); The time function is added here to trigger a difference in the browser’s cache registration so that the same file can be used by many concurrent users of the same web page. This code will send the graph shown in Figure 8-12 to the browser. Remember that you can augment this display with other HTML markup if desired. Figure 8-12. Pie chart generated by JPGraph and PHP 106 | Chapter 8: PHP and Friends
- If you decide to add additional formatting to the output of the graph, you will have to save the generated graphic as a file and pivot it to the server’s hard drive for later display with the accompanying HTML. The stroke method used to generate the graph has an option to name the file and save it for you. The code to save the graphic is: $graph->Stroke("graph.jpg"); And the code to bring the graphic back to combine with HTML code is: echo (''); Bar Charts Another type of chart that we can create is a bar chart. Again, here we will provide the benchmark values to the graph directly for easier code review. The code for this sample follows, and you will see that it uses the specific sublibrary for bar charts to work properly. Other than the proper selection of the sublibrary, there is really not too much difference in the approach—there are specific methods used, but the concept is basi- cally the same. Here is the code: include ("../../jpgraph/jpgraph.php"); include ("../../jpgraph/jpgraph_bar.php"); include ("../../jpgraph/jpgraph_line.php"); // We need some data $datay=array(31,44,49,40,24,47,12); // Set up the graph $graph = new Graph(600,300,"auto"); $graph->img->SetMargin(60,30,30,40); $graph->SetScale("textlin"); $graph->SetMarginColor("teal"); $graph->SetShadow(); // Create the bar pot $bplot = new BarPlot($datay); $bplot->SetWidth(0.6); // Set up color for gradient fill style $tcol=array(100,100,255); $fcol=array(255,100,100); $bplot->SetFillGradient($fcol,$tcol,GRAD_VERT); $bplot->SetFillColor("orange"); $graph->Add($bplot); // Set up the title for the graph $graph->title->Set("Sample Bargraph"); $graph->title->SetColor("yellow"); $graph->title->SetFont(FF_VERDANA,FS_BOLD,12); // Set up color for axis and labels $graph->xaxis->SetColor("black","white"); Graphical Reports Generation | 107
- $graph->yaxis->SetColor("black","white"); // Set up font for axis $graph->xaxis->SetFont(FF_VERDANA,FS_NORMAL,10); $graph->yaxis->SetFont(FF_VERDANA,FS_NORMAL,10); $graph->yaxis->title->Set("Value Range"); $graph->yaxis->title->SetColor("white"); $graph->yaxis->title->SetFont(FF_VERDANA,FS_NORMAL,10); // Set up X-axis title (color & font) $graph->xaxis->title->Set("item Count"); $graph->xaxis->title->SetColor("white"); $graph->xaxis->title->SetFont(FF_VERDANA,FS_NORMAL,10); // Finally send the graph to the browser $graph->Stroke(); Figure 8-13 shows the chart that this code produces. Figure 8-13. Bar chart generated by JPGraph and PHP 108 | Chapter 8: PHP and Friends
- Captchas One last quick sample is in order. If you have ever ordered concert tickets online, you will be familiar with the kind of antispam image shown in Figure 8-14. Figure 8-14. Antispam graphic generated by JPGraph and PHP JPGraph can generate this kind of captcha in just a few lines of code, and the supplied characters can be either provided manually (by you) or generated randomly: require_once "../../jpgraph/jpgraph_antispam.php"; $spam = new AntiSpam(); // saved to $chars for later verification of correct entry $chars = $spam->Rand(8); $spam->Stroke() ; Be sure to visit the website for this library and review all the other options that it pro- vides. You can add background images to the graphs, adjust the grid lines behind the bars, and so much more. Many other types of charts and graphs are also available, like stock, radar, scatter, polar, and Gantt charts. Graphical Reports Generation | 109
- CHAPTER 9 PHP Security In today’s world of identity theft and credit card fraud, it is imperative for websites to be as secure as possible. It has been proven time and again that nothing is 100 percent foolproof in the security field, so it behooves (I’ve always wanted to use that word in a book) us to be as diligent as possible in protecting the information and websites that have been placed in our trust. When using PHP, there are a number of best practices to follow in an attempt to mitigate the risks. The most vulnerable portions of a website are any places where data is entered or manipulated. Although that sounds vague and indicates a potentially large target area, I really mean to make you think about all of the areas in your websites where potential attackers can interact with your site. Let’s examine these areas in detail and look at some examples of how you can reduce their vulnerabilities. Data Validation Any area of your website that allows for data input is a potential risk area: data entry forms, search inputs, query strings, and so on. The general rule of thumb here is to treat any outside source of data as suspect, and to manage it by filtering it as soon as it becomes available to you. What does filtering mean? Well, once data is passed to your control, you inspect it and alter it if needed—or reject it if it does not meet your input criterion. This is known as validating your data on the most basic of levels. The section “Cross-Site Scripting (XXS) and SQL Injection” on page 115 describes a deeper pro- tection process that you should also follow. Data can be passed to a form via the $_GET and $_POST superglobal arrays (and their “parent” entity, $_REQUEST). Data can also be sent to a website through $_COOKIE and $_SESSION arrays. Let’s look at how to handle this information in a general sense. You will have to know where the data will come from (a form that you created), otherwise that information will remain harmless. If, for example, there is malicious data in the $_COOKIE array but you never use it, you are generally safe. 111
- When “catching” (or intercepting) submitted data, arrays are just right for the job, so be sure to always initialize an empty array at the beginning of your code. That way, you will be sure that its genesis is always clean and under your control. In fact, it is always good practice to initiate your variables; this gives you control over their content from the outset. I use an array named $trusted for this purpose. Let’s say you have a basic submission form that will accept a first name, a last name, and a phone number. The first name has to be 35 characters or fewer in length, the last name 45 characters or fewer, and the phone number has to be numeric only and 10 characters in length (no brackets around the area code and no dash after the exchange prefix). This form will use the POST method for submission. Here is the code that will display the form (pure HTML): First Name: Last Name: Phone: Here is the code that will accept that submission and filter the input: $trusted = array() ; if (strlen($_POST['firstname'])
- array(3) { ["firstname"]=> string(5) "Peter" ["lastname"]=> string(9) "MacIntyre" ["phone"]=> string(10) "9025551234" } This code uses the is_numeric function and not the is_int function for validation, because HTML forms return fields of type “text” as character strings. You can see this in the output, where the phone element in the array is listed with a data type of string(10). If you really want to test for numerical data, cast the incoming data to an integer data type first. There are many other methods of data validation or manipulation you can use, such as forcing the initial letter in a name field to be capitalized (ucfirst PHP function), forcing uppercase for all in a provided string (ucwords PHP function), requiring a field to contain data (if ($fname == "") { //raise an error }), and so on. It is impossible to go through all possible validation methods here, since they depend on the data being collected in the form and what you plan to do with that data once it is collected. The point here is that there is some data interception and possible massaging being done on data that is provided to your web pages from an outside (untrusted) source. Although this is not purely a security programming technique, it certainly helps with data integrity. It also helps to ensure that your data is in pristine condition before it is saved to a database. Escape Output The other side of the coin in web data security is preparing your information to be sent out to one of two destinations (generally): to the web browser as display output or to a database as storage output (to a database engine). It is a common mistake to think that because the data is yours and you filtered it when you received it, it is free from error and therefore will be just fine to send as output. Remember the caveat that is the security mantra: never completely trust your data, even if it is yours. In other words, “better safe than sorry.” So the first area of output that we will look at is sending data to a browser. Remember, PHP is basically an HTML generator: the actual code that shows on the user’s browser when you display the source is raw HTML. To help PHP turn out proper HTML, we can use the htmlspecialchars function. This function turns relevant data into its re- spective HTML equivalent, thus rendering it as raw output rather than actionable HTML code. Here is an example: $string = "'Fred' & 'Barney' click here, you know you want to" ; // note the single quotes. echo htmlspecialchars($string); echo "" ; echo htmlspecialchars($string, ENT_QUOTES); Escape Output | 113
- Notice that the second call to htmlspecialchars uses a second parameter of a defined constant. This tells PHP how to deal with any quotation marks that may be embedded within the string. Table 9-1 lists the options that you can use with this parameter. Table 9-1. Defined constant options for htmlspecialchars function Defined constant Effect of use ENT_COMPAT (default) Will convert double quotes and leave single quotes alone. ENT_QUOTES Will convert both double and single quotes. ENT_NOQUOTES Will leave both double and single quotes unconverted. The browser output of this string is: 'Fred' & 'Barney' click here, you know you want to 'Fred' & 'Barney' click here, you know you want to And the revealed source code display looks like this: 'Fred' & 'Barney' <a href='http://www.abadsite.com'> click here, you know you want to</a> 'Fred' & 'Barney' <a href=' http://www.abadsite.com'>click here, you know you want to</a> As you can see, if someone were attempting to insert a link into your site, it would merely be displayed as text output and the link would not be active (clickable). htmlspecialchars only acts on the most common forms of HTML ele- ments. These are ampersand (&), double quotes, single quotes, greater than (>), and less than (
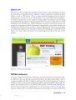
- ERROR: Unclosed quote @ 31 STR: ' SQL: UPDATE team SET name = 'O'Mally' WHERE teamid = 15 The solution is to run the data that will be part of your SQL string through the mysql_real_escape_string function before you send it to the database. Your code should look something like this: // actually need a db connection established before this will work. $conn = mysql_connect("localhost","dbuser","password"); $db = "dbname"; mysql_select_db($db, $conn) or die( "Could not open $db"); $trusted['lname'] = mysql_real_escape_string("O'Mally") ; $sql = "UPDATE team SET name = '$trusted[lname]' WHERE teamid = 15" ; mysql_query($sql); mysql_real_escape_string is specific to the MySQL database engine. There are equivalent functions for other database engines for which PHP has drivers. Prepared statements in PDO also have this ability with the quote() function. If a database is in use that does not have its own native real_escape_string function, you can use the generic function called addslashes. Once this is done, the string will look like this before it is sent to the database, with the problematic quotation mark escaped with a backslash: UPDATE team SET name = 'o\'mally' WHERE teamid = 15 For more on escaping characters, see “The Great Escape” on page 34. Cross-Site Scripting (XXS) and SQL Injection Cross-site scripting and SQL injection occur when an attacker is attempting to inject some code (JavaScript or SQL) into a form on your website. Any data entry point on a form is vulnerable to this type of abuse. Without actually teaching you how to exploit a site, a simple test is to enter the following script into a search box on a website and submit it. alert("howdy") ; If an alert box comes up, the site is not as well protected as it could be. Figure 9-1 shows a site that I found with this exact issue. Most injection types of attacks depend on the desire of the attacker to cause your site some pain. The attacker has to spend some time on your site and make some educated guesses as to the nature of your underlying code, so try not to be overly obvious in naming your entities. Cross-Site Scripting (XXS) and SQL Injection | 115
- Figure 9-1. Browser showing XXS injection vulnerability The attacker could also attempt to inject additional SQL commands into a form. En- tering code like this into a field could expose an SQL injection opportunity: flintstone'; drop table customers; What is being attempted here is the abnormal completion of an SQL command that is naturally part of the website’s data processing and the insertion of additional SQL that will cause grief on the site. Now, this raises the point that the attacker would have to know the name of a table in order to make it drop, and you would have to be using the MySQLi multiquery function at the same time, but stranger things have happened. There are a couple ways to protect your site in this particular example. One is to filter the input and not allow any semicolons in the string of text. The other is to ensure that the web user (the credentials that you use in your code to access the database) does not have the right to drop tables. Using the two methods described in the previous sections (filtering input and escaping output), can almost always thwart these types of attacks. Password Encryption Security The last major security issue I’d like to discuss is the encryption of data that you want to ensure is not viewable in its native form. I am talking mostly of user passwords on websites that require clients to log in. There are other examples, such as Social Security (Social Insurance in Canada) numbers, credit card numbers, and so on. The sha1 encryption algorithm (soon to be upgraded to sha2 level) is the way to go. When em- ploying this encryption function, PHP will convert a supplied string value to a 40- character hexadecimal number. This is known as one-way encryption because there is really no way to reverse the encryption once it is done (but of course that is the whole point). Here is an example: 116 | Chapter 9: PHP Security
- $string = 'myPassword'; echo sha1($string) ; Here is the browser display of the hexadecimal output: 5413ee24723bba2c5a6ba2d0196c78b3ee4628d1 Some people have reported weaknesses in sha0 and sha1. However, an- other algorithm method that has been in popular use (MD5) has been noted to have reproducible exploits, so it is best to use the sha1 method for now and convert to sha2 when that new algorithm becomes availa- ble. It is expected sometime in 2012. If you want another, more secure level of encryption, you can use the “salt and pepper” approach, which means adding hardcoded values to both the front and back of the value that is to be encrypted, and then encrypting the entire string one more time. Having the values hardcoded in this manner makes it more difficult for an attacker to guess the algorithm and its inputs. Here is a sample, followed by its browser output: // this value would normally be provided by a login form $string = 'myPassword'; $salt = "peter" ; $pepper = "MacIntyre" ; echo "Here is the original sha1 encryption: " . sha1($string) ; echo "" ; $salt = sha1 ($salt) ; $pepper = sha1 ($pepper) ; $string = $salt . $string . $pepper ; echo "Here is the prepared string about to be further encrypted: " .$string ; echo "" ; echo "Here is the well seasoned encryption: " . sha1($string) ; Output: Here is the original sha1 encryption: 5413ee24723bba2c5a6ba2d0196c78b3ee4628d1 Here is the prepared string about to be further encrypted: 4b8373d016f277527198385ba72fda0feb5da015myPassword0f1d5a3227a9ce2b3bf67178b6ba 6e5264149a26 Here is the well seasoned encryption: 6dc853b97b4998340b28a84ba714299af1bddadf Security Tips Finally, here is a quick list of additional things you can do with your PHP environment to help mitigate some vulnerabilities and to avoid providing more information to po- tential attackers than necessary. Most of these assume that you have full control over your environment. If you do not have this level of control, talk to your hosting provider or change some of the php.ini settings on the fly as your code runs. Security Tips | 117
- • Turn off error display (do use the error log) in the php.ini file. • Make sure register_globals is turned off in the php.ini file (see the Appendix for more detail on this). • Use secure socket layer (SSL) certificates on your sites where required. • Keep your included library, SQLite files (if in use), and settings files outside your document root (so that they are not accessible via the web server). If you would like to explore the topic in a bit more depth, I fully recommend Chris Shiflett’s book Essential PHP Security (O’Reilly) and Ilia Alshanetsky’s php|architect’s Guide to PHP Security (Marco Tabini & Associates, Inc.) for more comprehensive coverage. 118 | Chapter 9: PHP Security
- CHAPTER 10 PHP 5.3 Good Parts PHP 5.3 was released in June 2009. It was a long time in the making and there are quite a few improvements and additions to PHP in this release. Some of the additions to the language were meant for version 6, but since version 6 seemed to be taking a while to come together, it was decided to release the features that were already complete and buy a little more time for version 6 as an added bonus. This chapter will briefly discuss some of the best improvements version 5.3 has to offer. There was a cornucopia (I have always wanted to use that word in a book, too) of enhancements made to PHP 5.3. Since these enhancements cover the entire PHP prod- uct spectrum, we will jump around to a few different concepts here. For example, namespaces primarily affect the object-oriented aspects of PHP while NOWDOC af- fects management and display of strings. If any of these topics seems confusing, please refer back to earlier sections of the book. Namespaces Namespaces are meant to help with potential naming clashes within different object- oriented and function libraries that may be in use within a single development project. You may have libraries from outside sources and libraries that you develop yourself, and two or more of these libraries may have similarly named classes or functions. You might have a PDF-generation library and an email-generation library, both with a func- tion named Generate. Without a whole lot of customization programming (and how do you decide which class to alter?), you would be in a real mess. The use of a namespace for each of these classes can help alleviate the problem. The concept is similar to that of a hard drive: you can’t have two files of the same name in the same folder (directory), but you can have files of the same name in separate folders—in effect, this is what namespaces do for PHP. In fact, the process of making reference to these namespaces is also similar in that they are referenced with assistance of the backslash (\) character (more on this later). There are some rules around creating a namespaces, and they are quite strict: 119
- 1. There cannot be any code in the file before the declaration of the first namespace (no HTML, no whitespace, nothing). OK, there are actually two exceptions: you can have comments and you can use the declare statement to define constants within the code file if you like. 2. You must use the keyword namespace. 3. The namespace must have a unique name, and you cannot use an existing PHP keyword. 4. Once a namespace is employed, all other code must be defined within a namespace. Here is an example (I am including the PHP tags here to show that Rule 1 is being honored): This will produce the output of: This is a test Hello there: Johnny At first glance, our sample code may not appear to be following rule 4; however, once the namespace Sample1 is defined, all the code following is actually part of that namespace. It is also possible to define more than one namespace and to have an open or global namespace. This is where we get to work around like-named entities. I should also mention that a better way to define namespaces is to use curly braces ({ and }) around the contents of the namespace. So we can rewrite the code above as follows: 120 | Chapter 10: PHP 5.3 Good Parts
- This produces the exact same output as before. It is recommended that you use the curly brace method for defining multiple namespaces, because it helps to visually set them apart and makes the code easier to follow. Once you begin to use multiple name- spaces, however, you must also define a global namespace—this is rule 4 coming into play once more. Consider these two code files; the first (chap9_listing2.php) has two namespaces defined and will be included in the second file. The second code file defines a global namespace (a namespace without an identifier) for the main body of the code, but makes use of (references) the code within the included namespace definitions. Notice that the global namespace encompasses the other two namespaces and that it is also possible to add comments to the code before the namespace declaration (a caveat to rule 1: comments do not count as code). The output for this code is: Namespaces | 121
- Hello there: Frank I am happy to make your acquaintance Peter Hello there: Frank I am happy to make your acquaintance Peter greetings from the global scope: Charlie As you can see, calling the same named function within different namespaces produces different output. The best way to reference entities within a namespace is to prefix the entity call with the identifier of the namespace separated by a backslash (\) character. Namespaces can be embedded within other namespaces, thus adding additional levels of complexity. Each level of the namespace is separated by another backslash (\) char- acter. So if Sample1 has another namespace called email_code and a function inside that called sendEmail, we would reference that function like this: Sample1\email_code\sendEmail() ; Notice in the lower section of chap9_listing3.php there are these two lines of code: use Sample1 as S1; S1\sayHello("Frank"); Here we are using another neat feature of namespaces: aliasing. If you are using code from an outside source that is beyond your control, and it has a long or strange name, you can give it your own name through this aliasing feature. Here, we alias the Sample1 namespace to a shorter reference of S1, then call its sayHello function. The final line of code, sayHello("Charlie") ; is called without any namespace prefix, which is how references to the global namespace are called. Closures (Anonymous Functions) Another addition to PHP 5.3 is known as a closure, or anonymous function. This concept allows you to create functions with no specified names. We can assign an anonymous function to a variable, as in the following example (notice the assignment is true to the rules of variable assignments in that it requires the ending semicolon): $person_info = function($name, $age, $eyecolor) { echo "greetings: " . $name . ""; echo "You are : " . $age . " years old"; echo "and your eye color is: " . $eyecolor . ""; }; $person_info('Peter', '43', 'brown'); $person_info('Dawn', '15', 'green'); We assign an unnamed function (closure) to a variable called $person_info and expect parameters for it—$name, $age, and $eyecolor. Then we can simply make reference to that variable and pass it values, almost like calling an actual function. 122 | Chapter 10: PHP 5.3 Good Parts
CÓ THỂ BẠN MUỐN DOWNLOAD
-
PHP: The Good Parts: Delivering the Best of PHP- P1
 20 p |
  199
|
199
|  85
85
-
PHP: The Good Parts: Delivering the Best of PHP- P2
20 p | 129
| 52
-
PHP: The Good Parts: Delivering the Best of PHP- P4
20 p | 120
| 36
-
PHP: The Good Parts: Delivering the Best of PHP- P3
20 p | 118
| 33
-
PHP: The Good Parts: Delivering the Best of PHP- P8
20 p | 114
| 25
-
PHP: The Good Parts: Delivering the Best of PHP- P9
16 p | 121
| 25
-

PHP: The Good Parts: Delivering the Best of PHP- P5
20 p | 106
| 24
-
PHP: The Good Parts: Delivering the Best of PHP- P6
20 p | 131
| 24


Chịu trách nhiệm nội dung:
Nguyễn Công Hà - Giám đốc Công ty TNHH TÀI LIỆU TRỰC TUYẾN VI NA
LIÊN HỆ
Địa chỉ: P402, 54A Nơ Trang Long, Phường 14, Q.Bình Thạnh, TP.HCM
Hotline: 093 303 0098
Email: support@tailieu.vn
Giấy phép Mạng Xã Hội số: 670/GP-BTTTT cấp ngày 30/11/2015 Copyright © 2022-2032 TaiLieu.VN. All rights reserved.

