


The Adobe Photoshop Cs4 Dictionary: The a to Z Desktop Reference of Photoshop- P7
lượt xem 18
download
 Download
Vui lòng tải xuống để xem tài liệu đầy đủ
Download
Vui lòng tải xuống để xem tài liệu đầy đủ
Tham khảo tài liệu 'the adobe photoshop cs4 dictionary: the a to z desktop reference of photoshop- p7', công nghệ thông tin, đồ họa - thiết kế - flash phục vụ nhu cầu học tập, nghiên cứu và làm việc hiệu quả
Bình luận(0) Đăng nhập để gửi bình luận!
Nội dung Text: The Adobe Photoshop Cs4 Dictionary: The a to Z Desktop Reference of Photoshop- P7
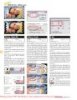
- vV VERSION CUE, PROJECT CREATION 1 1 2 1 2 3 4 2 5 6 7 8 9 10 11 Version Cue, project Version Cue task creation buttons Menu: Bridge: Tools > Version Cue > New Project Menu: Bridge: Windows > Favorites Shortcut: – See also: Version Cue Shortcut: – See also: Version Cue Version: 6.0, 7.0, CS, CS2 Version: CS3, CS4 The Version Cue program bases most of its The Version Cue Content panel contains a features and management tools around a series of task buttons across the top of the 3 project structure. This means that the first window. The buttons change depending step in employing Version Cue to manage on whether the Content panel is displaying your files is to create a project. the general server view, sometimes called The easiest way to create a new project in the Version Cue Welcome Screen (top), or CS2, CS3 and CS4 is from inside Bridge. the more specific project view (bottom). When Version Cue is installed alongside 1. Go to the Welcome Screen. Bridge and other Suite components, extra Version Cue options become available in 2. Connect to a Version Cue server. Versions the Bridge menus. 3. Create a new project. Menu: CS2: File > Save a Version CS3: File > Save As To create a new Version Cue project select 4. Hide/Display the Inspector panel. Shortcut: – See also: Version Cue Version: CS2, CS3, CS4 the New Project option from the Tools > 5. Synchronize project files. Version Cue menu (1) for CS2 users or click 6. Check project files in. Versions is a very useful feature for on the Version Cue option in the Favorites designers and photographers who create 7. Check project files out. panel and then the New Project button multiple editions of the same image or in the content workspace for CS3/CS4 8. Revert to a previous version of the design. The feature allows you to use the users. file. File > Save a Version option from inside This action will display the New Project 9. Delete file. Photoshop. Next a Save a Version dialog dialog where you can input project details 10. View file versions. is displayed (3). The window contains such as location, name and comments all the details for the picture as well as a 11. View the contents of the project’s trash space for you to enter comments about the as well as make the decision to share or can. not share access to the project and its version you are saving. After clicking the associated resources (2). Save button the latest version of the file is then saved and displayed in the standard thumbnail view in Bridge, but when the workspace is switched to the Versions and Alternates View all the previous iterations of the design are also shown. Alternatively, right-clicking on the picture V and selecting the Versions option (1) from the pop-up menu displays just the versions available for the selected image (2). The version feature is only available when Version Cue is installed. Please purchase PDF Split-Merge on www.verypdf.com to remove this Photoshop CS4 A–Z 292 watermark.
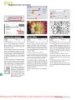
- VERTICAL TYPE TOOL vV Before After Vibrance +100 1 Video filters Menu: Filter > Video Shortcut: – See also: Filters, De-interlace filter Version: 6.0, 7.0, CS, CS2, 1 CS3, CS4 Photoshop contains two specialist filters designed to alleviate common problems encountered when working with images that have been grabbed from video 2 footage. Listed under the Filter > Video menu the options are: De-interlace – This filter is used to replace 2 the missing picture detail that exists in captured video frames. It does this by either interpolating the pixels or duplicating the ones surrounding the area. Interpolation provides the smoothest results and Vertical Type tool Vibrance adjustment Duplication the sharpest. The filter is not Menu: – Menu: Layer > New Adjustment Layer > Vibrance Shortcut: T See also: Horizontal Type Shortcut: – See also: Adjustments panel applied via the Filter Gallery dialog but Version: 6.0, 7.0, CS, CS2, tool Version: CS4 rather has its own specific dialog that CS3, CS4 contains the Interpolation option. The Vibrance adjustment is a new Along with the traditional Horizontal Type adjustment type and layer. The feature can NTSC Colors – The NTSC Colors filter option, Photoshop also provides a Vertical be selected from the Adjustments panel (1) ensures that the colors in the image will Type tool that arranges the letters on top of or by selecting the entry from the Layer > fit within the range of hues available for the each other rather than side by side. New Adjustment Layer menu. With this NTSC television format. This sometimes Located in the same fly-out menu as the feature you can alter the Vibrance of the means that the color gamut of the original other Type tool options (1), the Vertical photo as well as the Saturation (2). image is compressed to ensure that no Type tool aligns the type according to the single hue is oversaturated when displayed Changes in Vibrance differ to Saturation via the television system. starting placement of the cursor (insert as they target the strength of the color in point) and the alignment option (2) the less saturated areas only. There is also selection in the options bar. a measure of protection from change for The top align option adds letter shapes skin tones as well. Saturation changes, on above the insertion point, the bottom align the other hand, are color strength changes below the insertion point and the center applied at the same rate to all colors in the align places the text so that it straddles the photo. V insertion point. Please purchase PDF Split-Merge on www.verypdf.com to remove this watermark. Photoshop CS4 A–Z 293
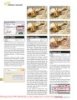
- vV VIDEO LAYERS 1 1 2 2 3 Video Preview Menu: Enhance > Adjust Lighting > Levels Shortcut: Ctrl/Cmd Alt/Opt Shft L See also: Curves, Shadow/ Version: CS2, CS3, CS4 Highlight The Video Preview option (1) is designed to export a preview image to an external video monitor. This option provides the Video Layers chance for makers of video destined files Menu: Layer > Video Layers > New Video Layer from File to review their creations in a format that Shortcut: – See also: – Version: CS3 Extended, they were intended for. CS4 Extended After selecting the feature the Video The Extended version of Photoshop Preview dialog appears (2). The options CS3 and CS4 contain a layer option for here allow you to choose and adjust video content. In response to the ever settings for the external device (monitor) 1 increasingly blurry line between still and and image. motion graphics, Adobe has increased Photoshop’s ability to deal with video footage and to interact with video editing View and effects packages such as Premiere and Menu: View > Shortcut: F See also: – After Effects. Version: 6.0, 7.0, CS, CS2, Video footage can be imported into CS3, CS4 Photoshop Extended (1) by opening the The View menu in Photoshop contains file directly into the program (File > Open) a variety of options that control the way or by placing a video sequence into an your image is displayed on screen. Also existing document as a new video layer included in this menu are settings for the (Layer > Video Layer > New Video Layer display of grids, guides, slices and proofing From File). The Video layer is denoted by setups. a small Filmstrip icon in the bottom right The Screen Mode settings (1) provide three of the layer’s thumbnail (2). different views of the workspace and can Much of the new functionality associated be coupled with the Tab shortcut option with manipulating video in Photoshop is to hide palettes, tool and option bars to centered around the Animation palette (3). display the picture on a clear uncluttered Video Notes: background. QuickTime 7.1 or higher must be installed Pressing the F key cycles through the to access the video options in Photoshop Screen modes. Hitting the Tab key hides V Extended. or displays the palettes. Right-clicking Photoshop cannot edit the audio content on the background while in Full screen of video files. mode displays a background color pop- up menu. Video files do not work in the Frame Mode in the Animation palette. Please purchase PDF Split-Merge on www.verypdf.com to remove this Photoshop CS4 A–Z 294 watermark.
- VIEWvV Standard Screen Mode 1 1 Maximized Screen Mode View As Details Menu: Bridge: View > As Details Shortcut: – See also: View As Version: CS3, CS4 Thumbnails Bridge’s View > As Details option displays image thumbnails in the Content panel along with associated metadata, rating and label information (1). As Details is one of several view options for Full Screen Mode With Menu Bar the panel. Selecting View > As Thumbnails displays the thumbnails plus file or folder name and choosing the Show Thumbnail View As Thumbnails Only entry displays the thumbnail Menu: Bridge: View > As Thumbnails Shortcut: – See also: View As Details image without any text, rating or label Version: CS3, CS4 information. The View > As Thumbnails option in Bridge displays image thumbnails in the Content panel along with their filename and rating or label information (1). As Thumbnails is one of several view Full Screen Mode options for the panel. Selecting View > As Details displays the thumbnails plus rating, label, metadata information and file or folder names and choosing the Show Thumbnail Only entry displays the thumbnail image without any text, rating or label information. Full Screen Mode plus Tab key V Full Screen Mode – black background Please purchase PDF Split-Merge on www.verypdf.com to remove this watermark. Photoshop CS4 A–Z 295
- vV VIEW – SHOW THUMBNAILS ONLY Before 1 After 2 1 Vignette Removal Vivid Light blending Menu: File > Automate > Photomerge Bridge: Tools > Photoshop > Photomerge mode Shortcut: – See also: Photomerge, Fisheye Menu: – Version: CS4 lenses, Geometric Shortcut: – See also: Blend modes Distortion Correction Version: 6.0, 7.0, CS, CS2, CS3, CS4 The Vignette Removal option (1) is one of the new features in the upgrade to the The Vivid Light blending mode is one of version of Photomerge that ships with the group of Overlay modes that base their CS4. Designed to remove any darkening effects on the differences between the two or lightening of the edges of source photos pictures. View – Show when stitching, the feature provides a smoother result across the final panorama This option combines the effects of both Color Burn and Color Dodge modes in Thumbnails Only (2). the one feature. The effect is created by Menu: Bridge: View > Show Thumbnails Only You can select the Vignette Removal option increasing or decreasing the contrast Shortcut: Ctrl/ Cmd T See also: View As Details depending on the brightness of the top Version: CS3, CS4 at the bottom of the Photomerge dialog. layer. If the tones are lighter than 50% then The View > Show Thumbnails Only option the picture is lightened by decreasing the in Bridge displays image thumbnails in contrast. If the top layer tones are darker the Content panel without any file names, than 50% then the picture is darkened by ratings, labels or other file information increasing the contrast. (1). The overall result is more contrasty and Show Thumbnails Only is one of several there is no effect if the top layer is 50% view options for the panel. Selecting View gray. > As Details displays the thumbnails plus rating, label, metadata information and file or folder names and choosing the View > As Thumbnails option displays the thumbnails plus file or folder name. V Please purchase PDF Split-Merge on www.verypdf.com to remove this Photoshop CS4 A–Z 296 watermark.
- Before wW WARP 1 After 2 3 wW ABCDEFGHIJKLMNOPQRSTU- VWXYZABCDEFGHIJKLM- NOPQRSTUVWXYZABCDEFGHIJKLMNOPQRSTUVWX- 4 YZABCDEFGHIJKLMNOPQRSTUV Warp Menu: Edit > Transform > Warp WXYZABCDEFGHIJKLMNOPQRSTUVWXYZA- Shortcut: – Version: CS2, CS3, CS4 See also: Transform again BCDEFGHIJKLMNOPQRSTUVWX- The Warp feature is an image YZABCDEFGHIJKLMNOPQRSTU- transformation option that was first introduced in CS2. Using this feature it is VWXYZABCDEFGHIJKLMNOPQR possible to distort an image layer in ways STUVWXYZABCDEFGHIJKLM- similar to how the Warp Text option Warp Text command manipulates text layers. Menu: – NOPQRSTUVWXYZABCDEFGHI- Shortcut: T See also: Type, Unwarp type Select the layer to warp and then choose Version: 6.0, 7.0, CS, CS2, JKLMNOPQRSTUVWXYZABCDEF- the Warp type from the preset entries in CS3, CS4 GHIJKLMNOPQRSTUVWXYZABCDEFGHIJKLMN the drop-down menu in the tool’s options One of the special features of the Photoshop bar (1). Alternatively you can select the type system is the ‘Warping’ option. OPQRSTUVWXYZABCDEFGHI- Custom option and then interactively push This tool forces text to distort to one of a JKLMNOPQRSTUVWXYZABCDEF- and pull the warp grid (2) to manipulate range of shapes. An individual word, or the picture yourself. GHIJKLMNOPQRSTUVWXYZABC- even whole sentences, can be made to curve, bulge or even simulate the effect of DEFGHIJKLMNOPQRSTUVWXYZABCDEFGHIJ a fish-eye lens. KLMNOPQRSTUVWXYZABCDEFGHIJKLMNOPQRSTU- The button (1) for the option is found on the options bar of the Type tool. The feature’s VWXYZABCDEFGHIJKLM- NOPQRSTUVWXYZABCDEFGHI- 1 dialog contains a drop-down menu list of styles (2) and a choice between vertical and horizontal warping (3). The strength JKLMNOPQRSTUVWXYZABCDEF- and style of the effect can be controlled by GHIJKLMNOPQRSTUVWXYZABC- manipulating the bend, horizontal and vertical distortion sliders (4). DEFGHIJKLMNOPQRSTUVWXYZABCDEFGH- This feature is particularly useful when IJKLMNOPQRSTUVWXYZABCDE- creating graphic headings for posters or web pages. FGHIJKLMNOPQRSTUVWXYZAB- 2 CDEFGHIJKLMNOPQRSTUVWX- YZABCDEFGHIJKLMNOPQRSTU- VWXYZABCDEFGHIJKLM- W Please purchase PDF Split-Merge on www.verypdf.com to remove this watermark. Photoshop CS4 A–Z 297
- wW Before WARP TOOL, LIQUIFY FILTER 1 1 2 2 3 3 After Water Paper filter Watercolor filter Menu: Filter > Sketch > Water Paper Menu: Filter > Artistic > Watercolor Shortcut: – See also: Filters Shortcut: – See also: Filters Version: 6.0, 7.0, CS, CS2, Version: 6.0, 7.0, CS, CS2, CS3, CS4 CS3, CS4 The Water Paper filter, as one of the group The Watercolor filter, as one of the group of Sketch filters, simulates the look of the of Artistic filters, adds both texture and photo being painted on a very wet textured brush stroke effects to the photo. watercolor paper. The edges of the picture The dialog contains three controls that are very soft and with some details lost adjust the painting and texture effects. The altogether. The colors and shapes blend top slider, Brush Detail (1), alters the look Warp tool, Liquify filter into each other and, in contrast to these of the painted areas. The Shadow Intensity Menu: Filter > Distort > Liquify parts, occasionally the sharp texture of slider (2) controls how much of the picture Shortcut: W (in Liquify) See also: Liquify filter Version: 6.0, 7.0, CS, CS2, the paper shows through. is converted to darker tones. High values CS3, CS4 The dialog contains three controls that mean more of the picture is shadowed. The Warp tool is one of the specialized tools adjust the tone and texture effects. The The final setting, the Texture slider (3), in the Liquify filter. The Warp tool is used to top slider, Fiber Length (1), alters the determines how detailed the painted areas push pixels as you move the cursor. sharpness and clarity of the painted image. of the picture will be. Low values create a sharper picture with After selecting the tool from the top left of more of the original details preserved. The the dialog carefully drag the cursor over Brightness slider (2) works like a standard the canvas surface. Use the Reconstruct brightness control. High values produce a tool to repair areas where the warping brighter picture, low values a darker one. effect is too great. The final setting, the Contrast slider (3), The example shows how easily an existing determines the overall contrast of the final photo can be drastically changed by result. warping specific picture parts. The area that is pushed is determined by the brush size on the right of the dialog. To make gradual rather than abrupt changes use a lower brush pressure. To warp along a straight edge click to start the line and then Shift-click to mark the end. W Please purchase PDF Split-Merge on www.verypdf.com to remove this watermark. CS4 A–Z 298 Photoshop
- WATERMARKS wW 1 2 1 2 © www.ablestock.com 2005 2 1 Wave filter Web Photo Gallery Menu: Filter > Distort > Wave Menu: File > Automate > Web Photo Gallery Shortcut: – See also: Filters Bridge: Tools > Photoshop > Web Photo Gallery 3 Version: 6.0, 7.0, CS, CS2, Shortcut: – See also: Automate CS3, CS4 Version: 6.0, 7.0, CS, CS2, CS3, CS4 The Wave filter, as one of the group of Distort filters, breaks up the picture by The Web Photo Gallery Wizard is an pushing and pulling the pixels in the form automated feature that takes a group of of a series of vertical and horizontal waves. pictures that have been multi-selected in The end results can be subtle or extreme Bridge and transforms them into a fully depending on the settings used. functioning website in a matter of a few Watermarks The dialog contains several controls that minutes. Menu: Filter > Digimarc > Read Watermark are used to adjust the wave-like pattern Folders of pictures or images currently Shortcut: – See also: – open in the Photoshop workspace are used Version: 6.0, 7.0, CS, CS2, CS3, CS4 created on the picture surface. These include wavelength, amplitude, scale and as the source photos when the feature is Digital watermarks are slight, almost number of wave generators (1). The effects selected from within Photoshop. imperceptible, changes that are made to of different settings for these controls Photoshop ships with a variety of gallery pictures to store copyright and author’s can be previewed in the accompanying templates which can be selected and details within the image. thumbnail (2). previewed from inside the dialog. Photoshop has the ability to embed The text included in the gallery, along (very basic versions), detect and read the with picture size and quality, and site digimarc.com style of watermarks. These colors and security options are set via the are created and added to images either by controls included in the tabbed section of the stand-alone software provided by the the dialog. company or via filter plug-ins in programs like Photoshop or Photoshop Elements. Most templates produce a gallery site that includes thumbnail and feature-sized To check to see if a picture you are editing photos. Many contain a main or index is watermarked, select Filter > Digimarc > page, a series of thumbnails (1) and a page Read Watermark (1). Marked pictures will for each image containing a larger gallery then display a pop-up dialog with author’s or feature picture (2). details and a linked website where further details of use can be obtained (2). To embed a simple watermark select Filter > Digimarc > Embed Watermark and then select the options to include (3). Note: The example pop-up dialog shown here is in Demo mode. Registered users of the Digimarc system can mark their W pictures with more extensive information including name, address, e-mail and URL personal details. Please purchase PDF Split-Merge on www.verypdf.com to remove this watermark. Photoshop CS4 A–Z 299
- wW WEB SAFE COLORS 4 2 1 3 1 2 Welcome Screen Wet edges Menu: Help > Welcome Screen Menu: Window > Brushes Shortcut: – See also: – Shortcut: – See also: Brushes palette Version: 6.0, 7.0, CS, CS2 Version: 6.0, 7.0, CS, CS2, CS3, CS4 When Photoshop is first opened, the user is presented with a Welcome Screen Wet Edges is one of the brush characteristics containing several options. that can be customized in Photoshop. The effect simulates the look of accumulated The selections are broken into two different 4 sections – one detailing what is new in this paint (and therefore density of color and tone) that builds up at the edges of a wet version of the program and the second pool of water color paint (4). listing available tutorials. The dominance of the effect is determined To stop the screen displaying each time the by the hardness setting of the current program is opened deselect the Show this brush tip. Low hardness settings such dialog at startup setting in the bottom left as 30% (1) produce a more pronounced of the screen. The feature can be displayed result than those brush tips that are 100% Web Safe Colors at any time by selecting Help > Welcome hard (2). Menu: Window > Color Swatches Screen. Shortcut: – See also: GIF format The effect is activated by selecting the Wet Version: 6.0, 7.0, CS, CS2, CS3, CS4 Below is a list of the Welcome Screen Edges option in the Brushes palette (3). options for version CS2 of the program: The Web Safe set of colors is a group of 216 colors that can be accurately displayed by both Macintosh and Windows systems. Constructing your image of, or converting existing hues to, these colors will guarantee 3 that they display predictably as part of a website on any computer system. The Swatches palette (1) will display all the Web Safe Colors when the option is selected from the pop-up menu that is displayed when the side-arrow button (2) is pressed. When choosing colors with the Color Picker a Small Cube icon indicates the selected hue is not a web safe color. Click the cube to get Photoshop to find a web safe color that is nearest your choice (3). When converting photos to the GIF format W using the Save for Web & Devices feature you can elect to use the Web Safe palette (Restrictive option) for the conversion (4). Please purchase PDF Split-Merge on www.verypdf.com to remove this watermark. CS4 A–Z 300 Photoshop
- Daylight Fluorescent WHITE BALANCE, RAW wW As Shot 1 Auto WIA support Menu: – Shortcut: – See also: Import command Version: 6.0, 7.0, CS, CS2, White Balance, Raw CS3, CS4 Menu: – The process of downloading pictures Shortcut: – See also: Camera Raw 4.0 Version: 6.0, 7.0, CS, CS2, from your digital camera to the computer CS3, CS4 requires the installation of camera drivers before the transfer can begin. One of the real advantages of recording your photos in the Raw format is the ability Installing the software that came bundled to edit the white balance settings used for with your camera usually also takes care the pictures later on at the desktop. Though Cloudy of installing the drivers. Many cameras the setting used to capture the image use a WIA (Windows Image Acquisition) is recorded as part of the EXIF data you driver to connect to software that resides can elect to fine-tune this setting or even on the computer. disregard it altogether selecting a different Both Photoshop and Windows XP make setting to associate with the picture. use of WIA drivers to communicate with The White Balance option in the Camera a range of installed devices. Raw dialog (1) provides a series of preset This feature has largely replaced the older options designed to match specific light TWAIN import option found in earlier sources. As well as these set options the versions of Photoshop. Temperature and Tint sliders allow users Custom to customize their white balance settings for a given image. Controlling the white balance setting is one way to remove color casts in your photographs. Alternatively, intentionally choosing the wrong setting can be used to create dramatically different versions of your pictures as well. Tungsten W Please purchase PDF Split-Merge on www.verypdf.com to remove this watermark. Photoshop CS4 A–Z 301
- wW WIND FILTER 1 2 Wind filter Menu: Filter > Stylize > Wind Shortcut: – See also: Filters Version: 6.0, 7.0, CS, CS2, CS3, CS4 The Wind filter, as one of the group of Stylize filters, simulates the look of wind blasting across the canvas surface by adding trailing lines from the edge details. The dialog contains two controls, Method of type of wind (1) and Direction (2). A preview window is also supplied to help you judge the correct combination of settings for your photo. Window – Options Window – Tools Menu: Window > Options Menu: Window > Tools Shortcut: – See also: View Shortcut: – See also: View Version: CS3, CS4 Version: CS3, CS4 Photoshop CS3/CS4 include an Options The Tools entry in the Window menu was entry in the Window menu. first introduced in Photoshop CS3. Selecting or deselecting this option will Selecting this option will display the either display or hide the options bar which toolbox (this is default setting of the entry). sites just below the menu bar at the top of Unchecking the Tools entry will hide the the Photoshop workspace. toolbox. W Please purchase PDF Split-Merge on www.verypdf.com to remove this watermark. CS4 A–Z 302 Photoshop
- WORK PATHS, CONVERTING SELECTIONS TO wW 1 2 1 Work Paths, converting Workgroup Working spaces, ICC Menu: – selections to Shortcut: – See also: Version Cue profile Menu: – Version: CS, CS2, CS3, CS4 Menu: – Shortcut: – See also: Paths, Selections Shortcut: – See also: Color Settings Version: 6.0, 7.0, CS, CS2, As part of the process of creating a new Version: 6.0, 7.0, CS, CS2, CS3, CS4 project in Version Cue you have the option CS3, CS4 Many imaging workers steer away from of allowing the project, and its associated Unlike print, monitor, camera or scanner creating paths because they feel that the media assets, to be shared with others profiles, a working profile or space is tools needed to create and edit them (Pen in your network (1). Typically the group not linked to specific input or output and Direct Selection tools) are difficult and of users who collaboratively work on a characteristics. Instead a working space confusing to use. These same workers on common project is called a Workgroup. acts as an intermediate profile that provides the other hand often have no problem with Determining who has access and at what a base for editing and enhancing picture using the various selection tools to create level this access is granted is managed via colors and tones and also establishes a very sophisticated selections. the Version Cue administration utility. known reference point for these tones and If you fall into this category and need Here the administrator of the project colors when converting to other output to create a path quickly and easily then can add new users and alter their access specific spaces. the best approach is to start by making settings (2). The ICC profile that you choose to use a selection (1) . Next, display the Paths Version Cue is only available to as your working space should reflect palette and then click on the Make Work Creative Suite users. the requirements of the area that you Path from Selection button (3) at the work in the most. For instance, many bottom of the palette. photographers whose work is destined This automatically converts the selection for the printed page choose to use the to a path and places a thumbnail version AdobeRGB profile as their working space of the path in the palette (2). feeling that this space best suits their work environment. In contrast web designers often prefer to use sRGB as their working space as it reflects the characteristics of 2 screen-based display more easily than 3 other choices. The options in the Edit > Color Settings dialog allows you to set the working spaces that will be used in Photoshop for RGB, CMYK, Gray and Spot (color) pictures. Also in this dialog are controls (Color Management Policies) that govern how Photoshop handles opening pictures that are not tagged or tagged with a profile that is different to the one nominated for the W working space. Please purchase PDF Split-Merge on www.verypdf.com to remove this watermark. Photoshop CS4 A–Z 303
- wW WORKSPACE, BRIDGE NEW for CS2 NEW for CS2 1 1 Workspace, Bridge Menu: Bridge: Window > Workspace Shortcut: Ctrl/Cmd F1 – F6 See also: Workspace customize, Version: CS2, CS3, CS4 Workspace Photoshop The way that your photos are displayed in Bridge can be altered via the options listed under the Window > Workspace 1 2 menu (1). Here you can choose from five set workspace settings plus a reset setting or choose to save the current workspace as a custom setting. File Navigator workspace 2 Workspace, Photoshop Menu: Window > Workspace Shortcut: – See also: Workspace customize, Version: CS2, CS3, Workspace Bridge CS4 Filmstrip Focus workspace Workspace, customize Photoshop ships with a range of preinstalled Menu: Window > Workspace > Save Workspace workspaces (1) which can be located Bridge: Window > Workspace > Save Workspace listed under the Window > Workspace Shortcut: – See also: Workspace Bridge, Workspace Version: CS2, CS3, Photoshop menu. Each of these settings controls the CS4 appearance and position of palettes, the allocation of keyboard shortcuts as well Both Photoshop and Bridge contain as the appearance of menu items. options to customize and save specific workspace setups. When a workspace is Also listed in this menu are entries for saved the custom setting is added to the list resetting the workspace and saving of available workspaces that is displayed in customized workspace settings that suit your individual way of working. Lightbox workspace the Window> Workspace menu (1). To create your own custom space in Customized spaces are created by adjusting Photoshop or Bridge start by adjusting the the settings in the Keyboard Shortcuts & size and position of interface components Menus dialog (2) and arranging palettes such as palettes and panels. Next, select the before saving the setup via the Window > Save Workspace option from the Window Workspace > Save Workspace option. > Workspace menu and then enter the The newly created workspace then name and select the options to save in the becomes a separated entry at the bottom Save Workspace dialog (2). of the Workspace menu. Photoshop CS2, CS3 and CS4 have the additional benefit of being able to customize Metadata Focus workspace the keyboard shortcuts associated with the space and the appearance and contents of menus as well. This is achieved via the Keyboard Shortcuts & Menus dialog. W Please purchase PDF Split-Merge on www.verypdf.com to remove this watermark. CS4 A–Z 304 Photoshop
- XYZ XMP 2 1 1 2 XYZ ABCDEFGHIJKLMNOPQRSTU- VWXYZABCDEFGHIJKLM- NOPQRSTUVWXYZABCDEFGHIJKLMNOPQRSTUVWX- XMP 1 YZABCDEFGHIJKLMNOPQRSTUV Menu: – WXYZABCDEFGHIJKLMNOPQRSTUVWXYZA- Shortcut: – Version: 6.0, 7.0, CS, CS2, See also: XMP sidecar files BCDEFGHIJKLMNOPQRSTUVWX- CS3, CS4 XMP is short for Extensible Metadata 3 YZABCDEFGHIJKLMNOPQRSTU- Platform which is a metadata standard VWXYZABCDEFGHIJKLMNOPQR that Adobe built to house the information STUVWXYZABCDEFGHIJKLM- that relates to your picture files. Information such as author, camera, NOPQRSTUVWXYZABCDEFGHI- resolution, color space and keywords are all JKLMNOPQRSTUVWXYZABCDEF- stored in this format and for the most part XMP sidecar files the details are saved within the picture file Menu: – GHIJKLMNOPQRSTUVWXYZABCDEFGHIJKLMN itself, but when this is not possible the data Shortcut: – See also: XMP Version: 6.0, 7.0, CS, CS2, CS3, CS4 OPQRSTUVWXYZABCDEFGHI- is included in a separated sidecar file. The presence of this information makes In some situations a portion of the XMP- JKLMNOPQRSTUVWXYZABCDEF- based metadata that is stored with a searching, sorting and managing of GHIJKLMNOPQRSTUVWXYZABC- your pictures much easier as XMP is a picture is not saved in the file itself. Instead key technology used in many features in the information is stored in an XMP file DEFGHIJKLMNOPQRSTUVWXYZABCDEFGHIJ that is saved with the original photograph Bridge and other applications in Adobe’s KLMNOPQRSTUVWXYZABCDEFGHIJKLMNOPQRSTU- Creative Suites. (1). This extra file is called an XMP sidecar file (2). VWXYZABCDEFGHIJKLM- The XMP detail that is linked to your files can be viewed in Photoshop via the One example of the use of sidecar files is the NOPQRSTUVWXYZABCDEFGHI- File > File Info dialog (1) or by displaying settings changes made when processing a JKLMNOPQRSTUVWXYZABCDEF- the Metadata panel (2) in Bridge (View > file in the Camera Raw feature. The user Metadata Panel). can elect to save these changes settings in GHIJKLMNOPQRSTUVWXYZABC- the original file or with the file in a sidecar XMP is not the only metadata that can be format. DEFGHIJKLMNOPQRSTUVWXYZABCDEFGH- stored with your files. Details may also be attached in EXIF, GPS and IPTC formats. Where the detail is stored can be set in the IJKLMNOPQRSTUVWXYZABCDE- preferences for the feature, which can be When this occurs Adobe applications such FGHIJKLMNOPQRSTUVWXYZAB- as Photoshop and Bridge synchronize and selected via the Preferences entry in the describe this metadata in XMP in order to pop-up menu displayed by pressing the CDEFGHIJKLMNOPQRSTUVWX- ensure better integration with applications side-arrow next to the Settings menu in YZABCDEFGHIJKLMNOPQRSTU- features. the Camera Raw dialog. VWXYZABCDEFGHIJKLM- The Edit > Camera Raw Preferences dialog in Bridge 2.0 provides a clearer choice for setting up sidecar files. The ‘Save image settings in’ menu provides the options of using the Camera Raw database or Sidecar XYZ files for storing the development settings (3). Please purchase PDF Split-Merge on www.verypdf.com to remove this watermark. Photoshop CS4 A–Z 305
- XYZ ZIGZAG FILTER Original Original 1 2 3 4 Zoom In ZigZag filter Menu: Filter > Distort > ZigZag Zoom Out Shortcut: – See also: Filters Zoomed to 3200% Version: 6.0, 7.0, CS, CS2, CS3, CS4 The ZigZag filter, as one of the group of Distort filters, simulates up and down waves such as pond ripples. The dialog contains controls that adjust the style and intensity of the effect. The Amount slider (1) alters the strength of the ripple effect, which basically translates to the depth and height of the resultant waves. Low values create shallower, more subtle effects; higher numbers produce more dramatic results. The Ridges slider (2) increases or decreases the number of ridges used in the effect. Three different types of ZigZag filtration are available from the drop-down Style menu (3) – Pond ripples, Out from the center and Around the center. Also included is a simulated preview window, where the filter is applied to a wire frame representation of your picture (4). Zoom In/Zoom Out Menu: View > Zoom In/Zoom Out Shortcut: Ctrl/Cmd = See also: Zoom tool, Ctrl/Cmd - Navigator Version: 6.0, 7.0, CS, CS2, CS3, CS4 The View > Zoom In/Zoom out menu options magnify and reduce the size of the Zoom to 3200% onscreen image in a way that is similar to Menu: View > Zoom In the Zoom tool. Shortcut: Ctrl/Cmd + See also: View Version: CS3, CS4 Each selection of the menu item (or keystroke combination) changes the New for Photoshop CS3/CS4 is the ability magnification of the image by set to zoom in to a magnification of 3200%. increments between a minimum of 1 pixel At this level the pixels that make up even XYZ (usually less than 1%) and a maximum of a high resolution image like the example 3200%. are clearly visible. Please purchase PDF Split-Merge on www.verypdf.com to remove this Photoshop CS4 A–Z 306 watermark.
- Full screen zoom XYZ ZOOM TOOL High resolution using Zoomify 1 2 3 Zoom tool Menu: – Shortcut: Z See also: Match Zoom, Version: 6.0, 7.0, CS, CS2, CS3, CS4 Navigator Zoomify Menu: File > Export > Zoomify The Zoom tool is used to adjust the Shortcut: – See also: ZoomView files Version: CS3, CS4 magnification of your picture on screen. After selecting the tool from the toolbar, In CS3 and CS4 the Export > ZoomView choose a mode, Zoom In (1) or Zoom Out option has been replaced with the Export (2), from the settings in the options bar. > Zoomify feature. The feature works in Next click onto the picture part that you a similar way to its predecessor in that want to magnify, or make smaller. The it allows photographers to display high onscreen image will increase, or decrease, quality versions of their high resolution in size and the magnification value will be images on the internet. displayed in the title bar of the document Unlike ZoomView, though, Zoomify doesn’t window (3). require an additional viewer to be installed Sections of a picture can be zoomed to fit to view the resultant web pages. The image the width of the program’s workspace by tiles that are combined to make it possible click-dragging a zoom marquee around to zoom and pan across the high resolution the area to be enlarged. Automatically image are created in industry standard the selected area is enlarged to fit the JPEG format and the containing page and workspace. navigation controls are built with HTML and Flash. The functionality and look of the viewer can be customized by editing the Flash source code file (FLA file). After opening the picture that you want to convert to a high resolution web format, select File > Export > Zoomify. Adjust the settings in the Zoomify Export such as the Output location, Image Tile Options, and Browser Options. To complete the process click the OK button at the top of the dialog. This will start the process of creating the tiled image files, web page and navigational components of the zoomify site. XYZ Please purchase PDF Split-Merge on www.verypdf.com to remove this watermark. Photoshop CS4 A–Z 307
- XYZ ZOOMVIEW FILES Zoomed in view Standard view 1 4 3 ZoomView format Menu: File > Export > ZoomView Shortcut: – See also: ZoomView files Version: 6.0, 7.0, CS, CS2 The ZoomView file format is designed for delivering high resolution images over the internet. ZoomView files Photoshop users can convert their pictures Menu: File > Export > ZoomView into this format by selecting the File > Shortcut: – See also: ZoomView format Version: 6.0, 7.0, CS, CS2 Export > ZoomView feature. The Export to ZoomView feature allows 2 Pictures in this format can only be displayed when the free Viewpoint media image makers to save their pictures in an player (www.viewpoint.com ) is installed. innovative high resolution web deliverable Once installed the user can then zoom and format that allows both panning and pan high resolution photographs that have zooming from within the browser been saved in the ZoomView format. window. To convert your pictures to the viewpoint format open the file in Photoshop and then select File > Export > ZoomView (1). The Viewpoint ZoomView Save dialog is then displayed (2). Choose to include instructions with the web page (3), select the location where the ZoomView files will be saved, input the base filename, allocate a tile size and level of quality, and the dimensions that the picture window will be when displayed in a browser, and click OK. The feature creates two folders and two 1 associated files including the main page or HTML file (4). The Export to ZoomView option has been replaced with the Export to Zoomify command in Photoshop CS3. XYZ Please purchase PDF Split-Merge on www.verypdf.com to remove this Photoshop CS4 A–Z 308 watermark.
- Step by step IMPORTING PHOTOS INTO BRIDGE 01 IMPORTING PHOTOS INTO BRIDGE SBS From camera or card From camera or card reader (Standard) reader (Advanced) Menu: Bridge: File > Get Photos From Camera Menu: Bridge: File > Get Photos From Camera Shortcut: – OS: Mac, Windows Shortcut: – OS: Mac, Windows ABCDEFGHIJKLMNOPQRSTU- Version: CS3, CS4 See Adobe Photo Downloader Version: CS3, CS4 See Adobe Photo also: (APD) also: Downloader (APD) VWXYZABCDEFGHIJKLM- NOPQRSTUVWXYZABCDEFGHI- JKLMNOPQRSTUVWXYZABCDE- 1 1 FGHIJKLMNOPQRSTUVWXYZAB- CDEFGHIJKLMNOPQRSTUVWX- YZABCDEFGHIJKLMNOPQRST- To switch the Photo Downloader to the Select the From Camera or Card Reader Advanced version of the feature click on UVWXYZABCDEFGHIJKLM- option from the File menu, or select the the Advanced Dialog option at the bottom NOPQRSTUVWXYZABCDEFGHI- Bridge option from the pop-up dialog that of the window. is displayed when the card reader is JKLMNOPQRSTUVWXYZABCDE- connected to the computer. Choose the 2 Standard dialog. FGHIJKLMNOPQRSTUVWXYZAB- CDEFGHIJKLMNOPQRSTUVWX- 2 YZABCDEFGHIJKLMNOPQRSTU- VWXYZABCDEFGHIJKLMN- OPQRSTUVWXYZABCDEFGHI- JKLMNOPQRSTUVWXYZABCDE- As well as performing the basic setup actions indicated in the Standard step-by- FGHIJKLMNOPQRSTUVWXYZAB- After finding and selecting the source of the pictures adjust the Import Settings. step to the left, you can add in metadata CDEFGHIJKLMNOPQRSTUVWX- Browse for the folder where you want the details to be attached to each downloaded photographs to be stored and if you want file. Here, the Basic Metadata option is used YZABCDEFGHIJKLMNOPQRSTU- to use a subfolder select the way that this to add simple author and copyright folder will be named from the Create information. Use the drop-down menu to VWXYZABCDEFGHIJKLM- Subfolder drop-down menu. select any presaved metadata templates. NOPQRSTUVWXYZABCDEFGH- 3 IJKLMNOPQRSTUVWXYZABCDE- 3 FGHIJKLMNOPQRSTUVWXYZAB- CDEFGHIJKLMNOPQRSTUVWX- YZABCDEFGHIJKLMNOPQRSTU- VWXYZABCDEFGHIJKLM- NOPQRSTUVWXYZABCDEFGHI- Finally, choose what other actions Bridge The small checkboxes at the bottom right will take after downloading the files. Here of the preview thumbnails can be used to you can select to open Bridge after the choose which images to transfer. All photos transfer is complete, automatically convert are selected by default but can be the images to DNG format and even make deselected by clicking the UnCheck all a backup of the originals to another drive. option at the bottom of the preview Clicking the Get Photos button will transfer window. Click the Get Photos button to your pictures to your hard drive. start the import process. Please purchase PDF Split-Merge on www.verypdf.com to remove this watermark. Photoshop CS4 A–Z 309
- Step by step CHANGING BRIGHTNESS 02 CHANGING BRIGHTNESS Before After Curves Shadow/Highlight Brightness/Contrast Menu: Image > Adjustments > Curves Menu: Image > Adjustments > Shadow/Highlight Menu: Image > Adjustments > Brightness/Contrast Shortcut: Ctrl/Cmd M OS: Mac, Windows Shortcut: – OS: Mac, Windows Shortcut: – OS: Mac, Windows Version: 6.0, 7.0, CS, See Curves Version: CS, CS2, See Shadow/Highlight Version: 6.0, 7.0, CS, See Brightness/Contrast CS2, CS3, also: CS3, CS4 also: CS2, CS3, also: CS4 CS4 Levels Menu: Image > Adjustments > Levels Shortcut: Ctrl/Cmd L OS: Mac, Windows Version: 6.0, 7.0, CS, See Levels command The Brightness/Contrast feature provides CS2, CS3 also: a quick and easy adjustment of the overall brightness of the image. Pushing the slider to the right lightens the midtones. The simplest way to make a photo brighter using the Curves feature is to click-drag the midtone part of the curve upwards. Dragging the curve downwards makes the photo darker. Using curves to perform this action means that both the shadows and highlight tones are left untouched by the changes. The Shadow/Highlight feature provides some brightness control using the Shadows controls as long as the Tonal Width value Moving the Midtone Input slider to the left is kept pretty high. Moving the Amount increases the brightness of the photo. slider right brightens the darkest portions of the image. Please purchase PDF Split-Merge on www.verypdf.com to remove this watermark. CS4 A–Z 310 Photoshop
- Step by step ADJUSTING CONTRAST 03 ADJUSTING CONTRAST Before Levels Curves Menu: Image > Adjustments > Levels Menu: Image > Adjustments > Curves Shortcut: Ctrl/Cmd L OS: Mac, Windows Shortcut: Ctrl/Cmd M OS: Mac, Windows Version: 6.0, 7.0, CS, See Levels command Version: CS3, CS4 See Curves CS2, CS3, also: also: CS4 1 1 To increase contrast in a photograph move The newly revised Curves feature provides the Highlight and Shadow input sliders in more tonal enhancement options than ever the Levels dialog towards the center of the before. With the addition of a black and histogram. white input slider you can perform the same contrast enhancement step as in the 2 Levels feature. Just move the Highlight and Shadow input sliders in the Levels dialog towards the center of the histogram. Holding the Alt key whilst moving these Input sliders will preview the pixels that are being converted to pure black or white (clipped). As with the Levels sliders move After the controls inwards until you see the first few pixels and then adjust the sliders slightly to ensure no pixels are being Holding the Alt key whilst moving these clipped. Input sliders will preview the pixels that are being converted to pure black or white (clipped). Move the sliders in until you see 2 the first few pixels and then adjust the sliders slightly to ensure no pixels are being clipped. 3 To add more contrast click-drag the highlight portion of the curve upwards and the Shadow section downwards. This To reduce contrast in a photo, drag the creates a classic S shape to the curve. To Black and White Output sliders towards the reduce the contrast reverse these actions center of the histogram. moving the shadows upwards and the highlights downwards. Please purchase PDF Split-Merge on www.verypdf.com to remove this watermark. Photoshop CS4 A–Z 311
CÓ THỂ BẠN MUỐN DOWNLOAD
-

The Adobe Photoshop Cs4 Dictionary: The a to Z Desktop Reference of Photoshop- P1
 50 p |
  121
|
121
|  23
23
-

The Adobe Photoshop Cs4 Dictionary: The a to Z Desktop Reference of Photoshop- P2
50 p | 75
| 19
-

The Adobe Photoshop Cs4 Dictionary: The a to Z Desktop Reference of Photoshop- P8
28 p | 94
| 16
-
The Adobe Photoshop Cs4 Dictionary: The a to Z Desktop Reference of Photoshop- P3
50 p | 75
| 14
-

The Adobe Photoshop Cs4 Dictionary: The a to Z Desktop Reference of Photoshop- P4
50 p | 80
| 12
-
The Adobe Photoshop Cs4 Dictionary: The a to Z Desktop Reference of Photoshop- P5
50 p | 76
| 12
-
The Adobe Photoshop Cs4 Dictionary: The a to Z Desktop Reference of Photoshop- P6
50 p | 1597
| 12


Chịu trách nhiệm nội dung:
Nguyễn Công Hà - Giám đốc Công ty TNHH TÀI LIỆU TRỰC TUYẾN VI NA
LIÊN HỆ
Địa chỉ: P402, 54A Nơ Trang Long, Phường 14, Q.Bình Thạnh, TP.HCM
Hotline: 093 303 0098
Email: support@tailieu.vn
Giấy phép Mạng Xã Hội số: 670/GP-BTTTT cấp ngày 30/11/2015 Copyright © 2022-2032 TaiLieu.VN. All rights reserved.

