


Flash after effects sự kết hợp chuyên nghiệp phần 8
lượt xem 16
download
 Download
Vui lòng tải xuống để xem tài liệu đầy đủ
Download
Vui lòng tải xuống để xem tài liệu đầy đủ
Tham khảo tài liệu 'flash after effects sự kết hợp chuyên nghiệp phần 8', công nghệ thông tin, đồ họa - thiết kế - flash phục vụ nhu cầu học tập, nghiên cứu và làm việc hiệu quả
Bình luận(0) Đăng nhập để gửi bình luận!
Nội dung Text: Flash after effects sự kết hợp chuyên nghiệp phần 8
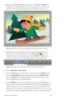
- Creating 3D Environments In the previous exercise you explored the 3D views available in the Composition panel. The default view is the Active Camera. The first two projects dealt with animating layers in 3D space. What if you want to animate the Active Camera? Well, you can’t. Instead, After Effects allows you to add your own camera as a 3D layer in a composition and animate it in 3D space. This exercise provides a step-by-step tutorial on adding a camera, positioning it in your 3D world, and finally setting keyframes to animate the camera through a 3D environment. The environment you will build out of 3D layers. The com- position will be rendered as a Flash Video file for Web delivery. You will then use ActionScript to add interactivity to the 3D world. To see what you will build, locate and launch the HauntedHallway.swf file in the Completed folder inside the 03_3DEnvironment folder in Chapter_06. Position the cursor over the arrow on the floor (Figure 6.33). As you proceed down the hallway, other animations are triggered to play based on cue points set in the FLV file. Figure 6.33: The final SWf file is an interactive 3D environment. Let’s deconstruct how the artwork was created for this project. Open the layered Photoshop file in the 03_Footage folder. The Photoshop file contains six layers. These layers will be imported and converted into 3D layers in After Effects. Each layer will be oriented in 3D space to create the final hallway scene. 156 Chapter 6: The Third Dimension
- Figure 6.34: The artwork was created in Photoshop on separate layers. The dimensions of the hallway are 2500 x 500 pixels at a resolution of 72 dpi. In Adobe After Effects, select File > Open Project. Open the 03_3DEnvironment 1. folder inside Chapter_06. Select 03_HauntedHallway.aep and click Open. The Project panel contains footage of each layer in the Photoshop file. Select Composition > New Composition. You need to make the composition 2. the same size as the Flash Stage you will be importing the 3D animation into. Make the following settings: 3 Composition Name: HauntedHallway 3 Width: 550 3 Height: 400 3 Pixel Aspect Ratio: Square Pixels 3 Frame Rate: 30 3 Duration: 0:00:10:00 Click OK. The new composition opens in the Composition panel. Click and drag the floor/HallwayScene.psd footage file from the Project panel 3. to the Timeline. Turn on the 3D Layer switch for the layer. Type P on the keyboard to display the layer’s Position property. Hold down the Shift key and type R to open the Rotation property as well. 157 Creating 3D Environments
- Set the X Rotation and Z Rotation to 90. 4. Set the Position property to 275.0, 450.0, and 0.0. 5. Figure 6.35: Rotate and position the floor layer in 3D space. Click and drag the wall/HallwayScene.psd footage file from the Project panel 6. to the Timeline. Position it on top of the previous layer. Turn on the 3D Layer switch for the layer. Open the Position and Rotation transform properties. 3 Set the Y Rotation to 90. 3 Set the Position property to 525.0, 200.0, and 0.0. Figure 6.36: Rotate and position the wall layer in 3D space. Duplicate the wall/HallwayScene.psd layer. Select the layer and press 7. Command + D (Mac) or Control + D (Windows). 3 Set the Y Rotation to 270. 3 Set the Position property to 25.0, 200.0, and 0.0. Figure 6.37: Rotate and position the duplicate wall layer in 3D space. Click and drag the ceiling/HallwayScene.psd footage file from the Project panel 8. to the Timeline. Position it on top of the previous layer. Turn on the 3D Layer switch for the layer. Open the Position and Rotation transform properties. 3 Set the X Rotation and Z Rotation to 90. 3 Set the Position property to 275.0, –50.0, and 0.0. This sets up the basic structure of the hallway. Next you will add the doorframe, door, and chandelier to the 3D scene. 158 Chapter 6: The Third Dimension
- Click and drag the doorframe/HallwayScene.psd footage file to the Timeline. 9. Position it at the top of the layers. Turn on the 3D Layer switch. 3 Set the Position property to 275.0, 200.0, and 1245.0. Figure 6.38: Position the doorframe layer in 3D space. Click and drag the door/HallwayScene.psd footage file to the Timeline. 10. Position it at the top of the layers. Turn on the 3D Layer switch. Type A on the keyboard to display the layer’s Anchor Point property. Hold down the Shift key and type P to open the Position property as well. 3 Set the Anchor Point to 0.0, 211.5, and 0.0. 3 Set the Position property to 155.0, 238.0, and 1245.0. Figure 6.39: Position the door layer in 3D space. Click and drag the chandelier/HallwayScene.psd footage file to the Timeline. 11. Position it at the top of the layers. Turn on the 3D Layer switch. 3 Set the Position property to 275.0, 20.0, and 0.0. 3 Twirl open the Materials Options. Turn on the Casts Shadows property. This layer will now cast realistic shadows when a 3D light is added to the scene. Figure 6.40: Position the chandelier layer in 3D space. This completes the 3D environment. Next, you will add a 3D camera. 159 Creating 3D Environments
- Select Layer > New > Camera. The Camera Settings dialog box appears. Enter 12. myCamera for the name. Set the preset to 50mm and check the checkbox to enable depth of field. Click OK. Go to the Composition panel. From the 3D View popup menu, select 13. Custom View 1. The Comp Window now displays a better angle to see the camera and the 3D hallway. Use the Orbit Camera Tool, Track XY Camera Tool, and Track Z Camera Tool 14. in the Tools panel to rotate and zoom out to see the entire composition. Figure 6.41: Rotate and zoom out using the 3D Camera tools. The camera has handles and an axis similar to other 3D layers. The triangular 15. shape attached to it defines the field of view from the camera lens. The straight line with a cross hair target at the end is the point of interest. This indicates which way the camera is pointing. Twirl open the camera transform properties. 3 Change the Point of Interest property to 275.0, 200.0, and 1250.0. 3 Change the Position property to 275.0, 260.0, and –1939.0. Figure 6.42: Change the Point of Interest and the Position properties. 160 Chapter 6: The Third Dimension
- The point of interest moves to the door at the end of the hallway. This guaran- tees that the camera will always be facing that door as it animates down the hall. The camera position is moved to the opposite end of the hallway. This will be the starting point for the animation. The vertical position was lowered to enhance the linear perspective in the scene. Figure 6.43: The custom view (left) and the Active Camera view (right) show the results of changing the camera’s position and point of interest. Return the 3D view to the Active Camera view. This view is now the same 16. as myCamera view. If you add more cameras to the composition, the Active Camera view will display the view for the selected camera in the Timeline. Let’s add some lights to the composition. Select Layer > New > Light. The Light 17. Settings dialog box appears. Set the Light Type to Point and click OK. A point light is an omnidirectional light source. Think of it as a bare light bulb. When a light is added to a composition, the default lighting turns off. Lights only affect 3D layers. Twirl open the Light transform properties in the Timeline. Set the Position 18. property to 275.0, 150.0, and 450.0. Twirl open the Light Options. Set the Intensity to 90%. Turn on the Casts 19. Shadows option. Click on the color swatch. The Parameter Colors dialog box appears. Change the RGB values to 180, 208, and 240. This will cast an eerie blue light over the 3D scene. Notice the cast shadow projected from the chandelier. Lighting can greatly enhance your 3D layers. Figure 6.44: Add a point light to the composition. Duplicate the Light 1 layer. Set the duplicate light’s Position property to 275.0, 20. 400.0, and –1000.0. Set the Intensity to 95%. This completes the lighting. 161 Creating 3D Environments
- It is time to animate the camera. Press the Home key on the keyboard 21. to move the CTI to 00:00. Select the myCamera layer in the Timeline. Click on the stopwatch icon 22. next to the Position property. This records the camera’s current position. Move the CTI to the nine second mark (09:00). Change the camera’s 23. Position property to 275.0, 260.0, and 625.0. The camera moves in close to the door at the end of the hallway. A new keyframe is created. Figure 6.45: Animate the camera along the Z-axis. Click on the RAM Preview button. The camera slowly moves down the 24. hallway. Save your project. The door is a separate 3D layer. Let’s create an animation that opens the door. 25. Move the CTI slightly past the nine second mark (09:10). Select the door/HallwayScene.psd layer in the Timeline. Click on the stopwatch 26. icon next to the Y Rotation property. This records the starting keyframe. Press the End key on the keyboard to move the CTI to the end of the 27. composition. Change the Y Rotation property to –102.0 degrees. This rotates the door around the Y-axis. Since you moved the layer’s Anchor Point to the left edge of the door in step 10, the door rotates at that point. Figure 6.46: Rotate the door layer around the Y-axis to open the door. Move the CTI in between the two keyframes you just created (09:19). 28. 162 Chapter 6: The Third Dimension
- Select the myCamera layer in the Timeline. Click on the gray diamond 29. to the left of the word Position. This adds a keyframe at the current time. Figure 6.47: Add a keyframe at the current time. Press the End key on the keyboard to move the CTI to the end of the 30. composition. Change the camera’s Position property to 275.0, 260.0, and 1025.0. The camera now animates through the open door. Just a couple of more steps needed before you render the Flash Video file. 31. First, select the doorframe/HallwayScene.psd layer. Select Effect > Color Correction > Hue/Saturation. Go to the Effect Controls panel and adjust the Master Lightness to –70. This darkens the doorframe to match the lighting. Select the door/HallwayScene.psd layer. Select Effect > Color Correction > 32. Hue/Saturation. Go to the Effect Controls panel and adjust the Master Lightness to –70. This darkens the door to match the lighting. Select the myCamera layer in the Timeline. Move the CTI to the four second 33. mark (04:00). Select Layer > Add Marker. Layer-time markers allow you to label specific points in time within the Timeline area. These markers are included in the rendered movie. A triangular marker appears on the selected layer duration bar. Double-click on it. The Layer Marker dialog box opens. Go to the Flash Video Cue Point and 34. Parameters section; enter bat for the name. Set the cue point to an Event. When you render the final composition as a Flash Video file, this marker will be included as a cue point. Flash can reference this cue point through ActionScript. Click OK. Figure 6.48: Add a Flash Video cue point at the four second mark. Move the CTI to the nine second mark (09:00). Select Layer > Add Marker. 35. Double-click on the new marker in the Timeline. In the Flash Video Cue Point and Parameters section, enter ghost for the name. Click OK. Figure 6.49: Add a Flash Video cue point at the nine second mark. 163 Creating 3D Environments
- Click on the RAM Preview button to view the final composition. 36. Select Composition > Make Movie. This opens the Render Queue. 37. Click on Lossless next to Output Module. Set the Format to Adobe 38. Flash Video. Click on Format Options and set the Bitrate setting to 700. Click on Output To and select the Chapter_06 folder on your hard drive as 39. the final destination for the rendered movie. Click the Render button. Let’s move to Flash. Double-click on 03_HauntedHallway.fla in the 40. 03_3DAnimation folder to open the file in Flash. It contains six layers: actions, buttons, bat, ghost, progressBar, and video. Let’s deconstruct a few layers. The bat layer contains a movie clip of a bat flying across the Stage. It has an instance name of bat_mc. The ghost layer contains a frame-by-frame animation of a floating ghost. Its instance name is ghost_mc. These movie clips will play when the corresponding cue point in the FLV file is reached during playback. Figure 6.50: The Flash file contains two movie clips that will play based on the embedded Flash Video cue points. The progressBar layer holds a Flash ProgressBar UI component. The FLV file was encoded at high quality in After Effects. This bar will provide user feedback as the video progressively downloads from the Web. Its instance name is pBar. The buttons layer holds a button symbol. When the cursor rolls over the button the FLVPlayback component will play the video file. When the cursor rolls off, the video stops. It has an instance name of forward_btn. Let’s add the video. Select the blank keyframe on Frame 1 of the video layer. Select File > Import > 41. Import Video. The Import Wizard dialog box appears. To import the FLV file: 3 Locate the HauntedHallway.flv file you rendered out of After Effects. 3 Set the deployment for Progressive Download from a Web Server. 3 Set the Skin to None. 3 Click Finish to create the FLVPlayback component on the Flash Stage. 3 Go to the Properties panel and enter an instance name of display. 164 Chapter 6: The Third Dimension
- Select the keyframe in Frame 1 of the actions layer. Open the Actions panel. 42. Enter the following code to import the Flash packages needed for this project. Also define the variables that will be used later. // import Flash packages import fl.video.*; import fl.controls.ProgressBarMode; // define Variables var flvScene = display; var flvSource = “HauntedHallway.flv”; Next, create four new sound objects that will play the sound effects and the 43. background sound. The audio files are stored externally from the Flash movie in a folder labeled Audio. // define sounds var windSound:Sound var batSound:Sound var ghostSound:Sound var laughSound:Sound // create new Sound Objects and link audio files windSound = new Sound(new URLRequest(“Audio/wind.mp3”)); batSound = new Sound(new URLRequest(“Audio/bat.mp3”)); ghostSound = new Sound(new URLRequest(“Audio/ghost.mp3”)); laughSound = new Sound(new URLRequest(“Audio/laugh.mp3”)); Set up the progress bar to manually update the number of bytes loaded using 44. the setProgress() method later in the code. The code pBar.indeterminate tells Flash that the file you are importing has a determinate (known) file size. // set progress bar state pBar.mode = ProgressBarMode.MANUAL; pBar.indeterminate = false; Define the Event Listeners for the FLVPlayback component and the buttons. 45. // add Event Listeners and load the video flvScene.addEventListener(VideoProgressEvent.PROGRESS, onLoading); flvScene.addEventListener(VideoEvent.READY, videoReady); flvScene.addEventListener(MetadataEvent.CUE_POINT, onCue); flvScene.source = flvSource; // add Event Listeners for the buttons forward_btn.addEventListener(MouseEvent.ROLL_OVER, moveForward); forward_btn.addEventListener(MouseEvent.ROLL_OUT, stopMoving); forward_btn.visible = false; ghost_mc.addEventListener(MouseEvent.CLICK, enterDoor); ghost_mc.visible = false; 165 Creating 3D Environments
- Define the Event Handlers that respond to the listeners. 46. // Event Handler controls the progressbar function onLoading(event:VideoProgressEvent):void { var bLoaded = Math.round(event.bytesLoaded/1000); var bTotal = Math.round(event.bytesTotal/1000); // Update progress... pBar.setProgress(bLoaded, bTotal); } // Event Handler removes progress bar when video is loaded function videoReady(event:VideoEvent):void { removeChild(pBar); forward_btn.visible = true; flvScene.stop(); windSound.play(0, int.MAX_VALUE); // loop audio indefinitely } // Event Handler controls the video playback function moveForward(event:MouseEvent):void { flvScene.play(); } function stopMoving(event:MouseEvent):void { flvScene.stop(); } // Event Handler for video cue points function onCue(event:MetadataEvent):void{ if(event.info.name == “bat”){ bat_mc.play(); batSound.play(); } if(event.info.name == “ghost”){ forward_btn.visible = false; ghost_mc.visible = true; ghost_mc.play(); ghostSound.play(); ghost_mc.buttonMode = true; } } // Event Handler for ghost button function enterDoor(event:MouseEvent):void { ghost_mc.visible = false; flvScene.play(); laughSound.play(); } Select Control > Test Movie. This completes the exercise. 47. Summary In this exercise you created a 3D environment using 3D layers, a camera and 3D lights. Cue points were also added for Flash interactivity. Through the use of ActionScript you controlled the playback of the video simulating a first-person style game. The cue points triggered other movie clips to play (Figure 6.51). 166 Chapter 6: The Third Dimension
- Figure 6.51: The published SWF file allows the user to walk down the hallway. Cue points embedded within the FLV file trigger other movie clips to play. Before you leave this chapter, let’s take a closer look at the camera settings. For this exercise and the previous one you added a camera with a 50mm lens. Why that lens? When dealing with 35mm film, a 50mm focal length creates an image that most closely approximates human sight. Changes in the focal length can drastically impact the depth perceived in your 3D environment. Wide angle lenses have much shorter focal lengths and tend to exaggerate depth. Figure 6.52 shows the same 3D environment seen through a 20mm focal length. It now looks like those never-ending hallways that occur in nightmares. Figure 6.52: A camera focal length of 20mm produces exaggerated depth. 167 Creating 3D Environments
- A telephoto lens uses a longer focal length. It does not capture a wide area of the 3D scene. The perceived depth is reduced considerably. Figure 6.53 shows the same 3D environment seen through a 135mm focal length. The hallway now looks like a very small, compressed space. Figure 6.53: A camera focal length of 135mm compresses the perceived depth. This completes the chapter. After Effects allows you to move layers in three dimensions with the click of a button. Although you cannot model realistic shapes, you can orient the flat layers to create unique 3D environments. In addition, you can rotate the layers, and add cameras and lights that add dramatic impact to your rendered movie. You also explored using video cue points to turn linear video into interactive 3D spaces in Flash. Some key concepts to remember from this chapter include: 3 When a layer is converted into a 3D layer, it acquires the Z-axis. 3 A 3D layer does not contain any thickness to it. 3 It is best to use the XYZ Rotation properties for any type of 3D animation. 3 Use the 3D views in the Composition panel to position and align 3D layers. 3 The Active Camera view is the default 3D view and the view that will be rendered when you export your final movie. 3 When a 3D light is added to a composition, the default lighting turns off. Lights only affect 3D layers. 3 Changes in a camera’s focal length can drastically impact the depth perceived in your 3D scene. 168 Chapter 6: The Third Dimension
- C HAPTER 7 Character Animation Bringing characters to life in Flash can be quite time consuming. After Effects offers a couple of creative tools that can help reduce production time when animating 2D characters. This chapter explores parenting and the Puppet tools. 2 Flash Character Animation ............................................. 170 2 Parenting ....................................................................... 170 2 Parenting Plus Expressions ..............................................177 2 The Puppet Tools ........................................................... 185 2 Interactive Puppets .........................................................191
- Flash Character Animation The art of character animation requires a lot of patience and practice. Flash provides many great tools for designing 2D characters. Using keyframes or ActionScript, these characters become virtual puppets that can walk, run, and jump. It is the act of linking each individual limb, such as a hand to an arm or a foot to a leg, where Flash could use some assistance. In practice, a character is divided up into several layers in the Flash Timeline. Each limb is typically a nested graphic or movie clip symbol (Figure 7.1). To rotate a limb correctly, the symbol’s registration point must be repositioned to where the joint would be if it were an actual puppet. The character comes to life through the use of a lot of keyframes. Where Flash is lacking is in providing a tool to hinge these character joints (layers) together. Figure 7.1: The anatomy of a Flash character is divided up into separate layers. Each limb is a nested symbol. The registration point for each symbol is positioned at the joints in the character. Parenting After Effects offers a technique called parenting that can assist in speeding up character animation for Flash. This method attaches one or more layers to a parent layer. If a parent layer moves across the Comp Window, the child layers follow. With the exception of opacity, any changes made to the parent layer’s transform properties are inherited by the child layers. Child layers can have their own animation, but these do not affect the parent. Locate the Chapter_07 folder on the DVD. Copy this folder to your hard drive. The folder contains all the files needed to complete the chapter exercises. 170 Chapter 7: Character Animation
- In this first exercise, you will learn how to assign parenting to several layers. Once the layers are linked together, you will then animate the character and export the final composition as a Flash SWF file. The SWF file will be imported into Flash. To see an example of what you will build, locate and launch the SuperHero.swf file in the Completed folder inside the 01_Parenting folder in Chapter_07 (Figure 7.2). Welcome to parenthood! Figure 7.2: The completed character animation uses parenting in After Effects. Create a new project in Adobe After Effects. 1. Import the footage file. Double-click inside the Project panel. This opens 2. the Import File dialog box. Locate the Superhero.ai file inside the 01_Footage folder in 01_Parenting/Chapter_07. Select the file. Choose Composition – Cropped Layers as the Import type. Click OK. Figure 7.3: Import the Adobe Illustrator file into the Project panel as a composition with cropped layers. 171 Parenting
- Double-click on the Superhero composition in the Project panel to open it in 3. the Timeline and Composition panels. Why import an Illustrator file instead of a Flash file? Each Illustrator layer imports with their original dimensions. Flash SWF files are imported as flattened rasterized files. Before you “parent” the layers, you need to move each layer’s anchor point. 4. This allows the character’s limbs to rotate correctly at the joints rather than at the center which is an anchor point’s default location. To do this: 3 Select the Head layer. Notice in the Comp Window the small cross hair target that appears between the superhero’s eyes. That is the anchor point. 3 Go to the Tools panel and select the Pan Behind Tool . 3 Go back to the Comp Window and click and drag the anchor point down to the superhero’s chin. This is similar to using the Free Transform tool in Flash to reposition a symbol’s registration point. Figure 7.4: Change the anchor point’s position using the Pan Behind Tool. With the Pan Behind Tool still selected, click on the torso layer. Reposition the 5. anchor point at the bottom of the torso (Figure 7.5). Move the remaining anchor points. With the Pan Behind Tool still selected: 6. 3 Click on a layer in the Comp Window. 3 Click and drag the anchor point to the proper location for the wrist, elbow, knee, and ankle joints. 3 The anchor point position for the upper arms should be close to the shoulder. 3 The anchor point position for the thighs should be at the hips. 3 The only layer that you will keep the anchor point at its default location in the center is the hips layer. To set up the parenting structure, you need to open the Parent column in the 7. Timeline panel. If it is not already visible, you can right-click on the Layer Name column header and select Columns > Parent. Now it is time to figure out which Figure 7.5: Change the anchor point’s position using layers are going to be the parents and which are the children. the Pan Behind Tool. Let’s start by connecting the Head layer (child) to the neck layer (parent). 8. There are a couple of ways to attach a child to a parent. You can use the Parent popup menu to select the appropriate parent. You can also use the Pick Whip tool located to the left of the popup menu. Click on the spiral icon (pick whip) for the Head layer and drag it to the name column of the neck layer (Figure 7.6). Release the mouse. You just linked the head and neck layers. 172 Chapter 7: Character Animation
- Figure 7.6: Use the Parent pick whip to link layers in After Effects. Link the other layers using the same technique. Click on the Parent pick whip 9. for each child layer and use it to point to its parent layer. Figure 7.7 shows you how to set up the parenting structure. If you study the parenting scheme, you will notice that the hips layer is the main parent layer for all the other layers. When it moves or rotates, all the layers will follow. Save your project. Figure 7.7: Parent the remaining layers as shown. Now the fun begins. Select the right UpperArm layer in the Timeline. Type R 10. on the keyboard to display the layer’s Rotation property. Scrub through the Rotation value. In the Comp Window the right upper and lower arm rotates along with the right hand. The child layers inherit the transform properties of the parent layer. The upper arm’s parent layer (torso) does not rotate. Figure 7.8: Rotate the upper arm. Its child layers rotate but the parent layer does not. 173 Parenting
- Select the right lowerArm layer in the Timeline. Open the layer’s Rotation 11. property. Scrub through the Rotation value. In the Comp Window the right lower arm and right hand rotate. The upper arm does not (Figure 7.9). Figure 7.9: Rotate the lower arm. Its child layers rotate but the parent layer does not. Let’s do a quick review. A child layer inherits transform properties from its parent layer. These include position, rotation, and scale. Opacity is not passed from parent to child. Also, any effect that is applied to the parent layer does not affect its children. A child layer can also animate on its own without affecting its parent. A child layer can only have one parent. So now that you have “parented” the layers, it is time to create the character animation. For this exercise, rather than stifle your creativity with step-by-step instructions, 12. just play and have fun animating the superhero character. To animate, set keyframes for the layers you want to move or rotate, drag the Current Time Indicator (CTI) to a new time in the Timeline and change the transform properties. Remember to save often. If you would like to see one possible solution, open the 01_Parenting_DONE 13. project in the Completed folder. The superhero composition is set to 30 frames per second and has a duration of two seconds. You can set the duration of your character animation to whatever you want. Select all the layers in the Timeline and type U on the keyboard. This opens all transform properties that contain keyframes (Figure 7.10). Let’s deconstruct how the character animation was done. 3 First, the vertical position of the hips layer was animated moving down in the Comp Window. All child layers moved with it. 3 Next, the left and right thighs were rotated to spread the legs apart. 3 The lower legs and feet were then rotated to maintain an invisible ground plane that the superhero was standing on. 3 Finally, the left and right arms were animated in the Comp Window. When creating character animation using the parenting technique, focus on one particular region at a time. Then go back and animate another section. By mak- ing multiple passes through the composition, you will create a much more effec- tive animation and not become overwhelmed by all the layers and keyframes. 174 Chapter 7: Character Animation
- Figure 7.10: Create a character animation using keyframed properties in the Timeline. Once you have finished the character animation, it is time to export it. Before 14. you do that, delete the background color layer. You want to export the SWF file with an alpha channel. Select File > Export > Adobe Flash (SWF). This opens the Save File As dialog 15. box. Save the SWF file to the 01_Parenting folder in Chapter_07. The SWF Settings dialog box appears. In the Images area, set After Effects 16. to Ignore Unsupported Features. Since the footage is an Adobe Illustrator file and does not contain any gradients, all the layers will export as vectors. Click OK. Save your After Effects project. Locate the exported Flash SWF file. 17. Double-click on it to play the animation in the Flash Player. 175 Parenting
CÓ THỂ BẠN MUỐN DOWNLOAD
-

Flash after effects sự kết hợp chuyên nghiệp phần 1
 48 p |
  99
|
99
|  28
28
-

Flash after effects sự kết hợp chuyên nghiệp phần 2
21 p | 96
| 21
-

Flash after effects sự kết hợp chuyên nghiệp phần 6
22 p | 90
| 17
-

Flash after effects sự kết hợp chuyên nghiệp phần 9
32 p | 99
| 17
-

Flash after effects sự kết hợp chuyên nghiệp phần 4
20 p | 96
| 16
-

Flash after effects sự kết hợp chuyên nghiệp phần 5
22 p | 77
| 16
-
Flash after effects sự kết hợp chuyên nghiệp phần 3
16 p | 100
| 15
-

Flash after effects sự kết hợp chuyên nghiệp phần 7
21 p | 87
| 15
-

Flash after effects sự kết hợp chuyên nghiệp phần 10
67 p | 69
| 13


Chịu trách nhiệm nội dung:
Nguyễn Công Hà - Giám đốc Công ty TNHH TÀI LIỆU TRỰC TUYẾN VI NA
LIÊN HỆ
Địa chỉ: P402, 54A Nơ Trang Long, Phường 14, Q.Bình Thạnh, TP.HCM
Hotline: 093 303 0098
Email: support@tailieu.vn
Giấy phép Mạng Xã Hội số: 670/GP-BTTTT cấp ngày 30/11/2015 Copyright © 2022-2032 TaiLieu.VN. All rights reserved.

