


Adobe Photoshop Elements 5.0 A–Z Tools and features illustrated ready reference- P4
lượt xem 21
download
 Download
Vui lòng tải xuống để xem tài liệu đầy đủ
Download
Vui lòng tải xuống để xem tài liệu đầy đủ
Tham khảo tài liệu 'adobe photoshop elements 5.0 a–z tools and features illustrated ready reference- p4', công nghệ thông tin, đồ họa - thiết kế - flash phục vụ nhu cầu học tập, nghiên cứu và làm việc hiệu quả
Bình luận(0) Đăng nhập để gửi bình luận!
Nội dung Text: Adobe Photoshop Elements 5.0 A–Z Tools and features illustrated ready reference- P4
- mM METADATA PALETTE Windows icons Metadata palette Mezzotint filter Minimize mode Menu: Photo Browser: Windows > Properties Menu: Editor: Filter > Pixelate > Mezzotint Menu: Editor: Window > Images > Minimize Mode Shortcut: Alt Enter OS: Mac, Windows Shortcut: – OS: Mac, Windows Shortcut: – OS: Mac, Windows Version: 1, 2, 3, 4, 5 See also: EXIF, File Info Version: 1, 2, 3, 4, 5 See also: Filters Version: 3, 4, 5 See also: Tile Windows, Cascade The Metadata palette in the Editor’s File The Mezzotint filter, as one of the Pixelate The Minimize mode (1) is one of the many Browser in version 3.0 or the Metadata tab group of filters, recreates tone and color ways that open pictures can be viewed in of the Windows > Properties palette shows in a similar way to the way it is produced Photoshop Elements. In versions 1 and 2 a variety of information about your picture with etched printing plates. A series of selecting this option from the Window > that is attached to the image file. Some of strokes, dots or lines is used in a pattern Images menu, or by clicking the button the detail is created at time of capture or to create detail and tone. Grayscale in the top right of the document window, creation and other parts are added as the pictures are recreated in black and white will display the picture as a title bar at file is edited. strokes, colored photos remade with a fully the bottom of the Editor workspace. The metadata that can be displayed (1) saturated pattern of colored texture. From version 3 onwards and with the includes File Properties, IPTC (copyright The filter contains no single slider control introduction of the photo bin, choosing and caption details), EXIF (Camera Data), to adjust the strength or positioning of the Minimize removes the active window from GPS (navigational data from a global effect, rather a drop-down menu of texture the work area but keeps its thumbnail in positioning system), Camera Raw and Edit types is provided (1). Each type (stroke, line, the photo bin. Choosing Restore from the History. To display the contents of each dot) creates a different pattern of texture thumbnail’s context menu reopens the file Metadata category click on the side arrow and tone. in the work area. Closing the file removes to the left of the category heading (2). it also from the photo bin. Some of the data displayed in this palette, Other options for displaying open documents include: M such as the copyright, description, author and caption information, can be edited via Maximize (2) – Displays the picture the the File > File Info dialog. maximum size in the workspace. The range of content types that is displayed Close (3) – Closes the document. in the palette is controlled by the selections Automatically tile windows (4) – in the Metadata Display Options (3). Automatically resizes open windows to fit the workspace, even when pictures are opened or closed. Multi-window mode (5) – Displays the document in its own smaller, movable window in the workspace. Please purchase PDF Split-Merge on www.verypdf.com to remove this watermark. 5.0 A–Z 148 Photoshop Elements
- MINIMUM FILTER mM Missing Profile version 1.0, 2.0, 3.0 Menu: – Shortcut: – OS: Mac, Windows Version: 1, 2, 3 See also: Color Settings After opting for a fully managed system in the Edit > Color Settings of Photoshop Elements, opening a picture that doesn’t have an attached ICC profile will display a Missing Profile dialog. Here you have three choices about how to proceed, and more importantly, how Elements will deal with the colors in the file: Minimum filter Leave as is – This option keeps the file free Modify Magic Menu: Editor: Filter > Other > Minimum Shortcut: – OS: Mac, Windows of a color profile. Not a preferred option. Selections Version: 1, 2, 3, 4, 5 See also: – Menu: – Assign working space AdobeRGB – Shortcut: – OS: Windows The Minimum filter, as one of the Other Attaches the profile recommended for Version: 4, 5 See also: Magic Selection Brush tool group of filters, grows or bleeds the pictures that are destined for printing. darker areas of the picture whilst at the Just like the other selection tools there Assign sRGB – Assigns a profile that is same time reducing the size of the lighter are tools to modify the selections that the recommended for photos that are used on toned parts. In making these changes, the Magic Selection Brush creates. the web or viewed on screen. filter analyses the brightness of the pixels When creating a new selection the brush is Select the assign option that most suits in a given area (radius) and reduces the in the default or New Selection mode (1). your output needs and then click OK. brightness to the level of the darkest pixel To include other areas in the selection in the area. click the Indicate Foreground button (2) The filter contains a single slider control in the tool’s options bar and paint or place that adjusts the radius (1) or size of the area a dot on a new picture part. This step will used to determine the pixel brightness cause Elements to regenerate the selection value. to include your changes. To remove an area from the selection, click Missing Profile on the Indicate Background button (3) and version 4.0, 5.0 scribble or dot the part to eliminate. Again Elements will regenerate the selection to Menu: – M Shortcut: – OS: Windows account for the changes. Version: 4, 5 See also: Color Settings The Shift and Alt keys can be used whilst In version 4 and 5 when you have the Allow drawing to change modes ‘on the fly’ and me to Choose entry as the Color Setting and add to or subtract from the selection. then opening a photo without an attached The Magic Selection Brush is available in profile Elements displays a different dialog both the Standard and Quick Fix Editor but still with three choices: workspaces. Leave as is – As before this option keeps the file free of a color profile. Optimize... for screen display – This replaces the Assign sRGB option but performs the same change. Optimize... for Print output – This option assigns the AdobeRGB profile which is recommended for printing. Note: You also have the option to check “Always take this action and don’t show me again”, which converts the color setting to the one you choose in the dialog box. Please purchase PDF Split-Merge on www.verypdf.com to remove this watermark. www.ElementsA-Z.com 149
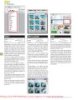
- mM MODIFY RANGE OF HUE SLIDERS Before After Modify range of Hue Modify selections Menu: Editor: Select > Modify sliders Shortcut: – OS: Mac, Windows Menu: Editor: Enhance > Adjust Color > Adjust Hue/Saturation Version: 1, 2, 3, 4, 5 See also: Smooth, Expand, Contract Shortcut: Ctrl/Cmd U OS: Mac, Windows Version: 1, 2, 3, 4, 5 See also: Hue/Saturation Existing selections can be modified in the The Hue/Saturation control adjusts the following ways: Mosaic filter color and vibrancy of color in a picture. Border – Choosing the Border option from Menu: Editor: Filter > Pixelate > Mosaic the Modify menu displays a dialog where Shortcut: – OS: Mac, Windows In the default mode, Edit Master, these Version: 1, 2, 3, 4, 5 See also: Filters changes are applied to all the colors in the you can enter the width of the border in picture. The drop-down Edit menu allows pixels (between 1 and 200). Clicking OK The Mosaic filter, as one of the Pixelate the user to select a different range of colors creates a border selection that frames the group of filters, simulates the look of a to apply the changes to. In the example, the original selection. pixel-based picture that has been enlarged hue of the blue colors in the picture was Smooth – This option cleans up stray pixels greatly. The photo is recreated in large altered to green. that are left unselected after using the single colored blocks. The filter contains Magic Wand tool. After choosing Modify a single slider control that adjusts the Cell In addition to selecting a specific color Size (1) or ‘pixel’ block size. The higher the to edit, the Hue/Saturation dialog also enter a Radius value to use for searching for stray pixels and then click OK. value entered here the larger the blocks provides the ability to fine-tune the range used to recreate the photo. of tones included in the selection. Expand – After selecting Expand enter the Two color bars are displayed at the bottom number of pixels that you want to increase of the dialog when a color range is selected the selection by and click OK. The original in the Edit menu. The top bar shows the selection is increased in size. You can enter M color currently selected; the bottom bar a Pixel value between 1 and 100. indicates the colors that the selected hues Contract – Selecting this option will will be converted to. Between the two reduce the size of the selection by the bars are four slider controls. The vertical number of pixels entered into the dialog. white bars (1) define the edges of the color You can enter a Pixel value between 1 and range and the triangles (2) are the edges 100. of the fall-off from the color range. By click-dragging the white bars the size and scope of the selected range can be altered. This allows fine-tuning of the colors selected and substituted. Please purchase PDF Split-Merge on www.verypdf.com to remove this watermark. 5.0 A–Z 150 Photoshop Elements
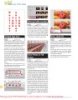
- MOTION BLUR FILTER mM Move tool – Rotate handle Menu: – Shortcut: – OS: Windows Version: 5 See also: Free Transform When transforming a frame or picture the marquee now contains a new rotate handle (1). To pivot a picture click and drag the new handle which is located at Move tool the bottom center of the marquee. Menu: – By default the handle rotates around the Shortcut: V OS: Mac, Windows center of the layer photo, frame or layer. To Motion Blur filter Version: 1, 2, 3, 4, 5 See also: Layer Highlight, Arrange, Align, Distribute pivot using another reference point click on a new handle in the Reference Point icon Menu: Editor: Filter > Blur > Motion Blur Shortcut: – OS: Mac, Windows The Move tool is used to change the position in the Move tool’s options bar (2). Version: 1, 2, 3, 4, 5 See also: Filters of layer content within the confines of the The Motion Blur filter is one of several image window. The Move tool has three blur options that can be found in the extended features in the options bar that Before Blur section of the Filter menu. This change the way that the tool works: feature is great for putting back a sense Auto Select Layer – Allows the tool to of movement into action pictures that automatically select the uppermost layer have been frozen by being photographed when the mouse cursor clicks on it. with a fast shutter speed. Used by itself, Show Bounding Box – Automatically the filter produces pictures that are very shows the bounding box (1) of the layer blurred and often lack any recognizable content that is currently selected. In this detail. For more realistic results apply this mode the corner and side handles of the filter via a feathered selection to help retain bounding box can be moved to scale the sharpness in some picture parts whilst layer contents. blurring others. Show Highlight on Rollover – When The filter dialog contains a single slider, a this option is selected a blue line surrounds preview window and a motion direction the contents of a layer when the mouse (angle) dial. The Angle dial (1) determines cursor moves over it. This feature is only the direction of the blur and should be set available in version 5.0 of the program. to simulate the natural direction of the M subject. The Distance slider (2) controls the Also new to the Move tool’s options bar for amount of blur added to the picture. version 5.0 are the Arrange, Align, and Multiply blending Distribute menus (2) which make use of the multi-layer select ability of the version. You mode can use the options found here to rearrange Menu: – Shortcut: – OS: Mac, Windows or alter the layout of the content contained Version: 1, 2, 3, 4, 5 See also: Blending modes in multiple layers in your document. The Multiply blending mode is one of the Other new features in version 5 include: group of Darken modes that multiplies • A new item in the tool’s context menu: the color of the bottom layer with the top, Edit Text. Choosing this option switches producing an overall darker result. to the Type tool and selects the text for When the top layer is black the resultant editing. blended layer is also black. There is no • The fact that the Move tool is change when the bottom layer is blended automatically selected when you apply with a white top layer. This blend mode is Graphics, Frames, Themes, or Shapes often used for creating fancy edge effects on from the Artwork and Effects palette. photos (see above) and it’s also very handy for ‘washed out’ or overexposed images. Simply duplicate the layer and set it to Multiply mode. Please purchase PDF Split-Merge on www.verypdf.com to remove this watermark. www.ElementsA-Z.com 151
- mM MULTI-PAGE DOCUMENTS Multi-Page PDF to PSD Multi-select photos Menu: Editor: File > Automate > Multi-page PDF to PSD Menu: – Shortcut: – OS: Mac, Windows Shortcut: – OS: Windows Version: 1, 2, 3 See also: – Version: 5 See also: – The Multi-Page PDF to PSD option located Photos can be multi-selected inside the in the File > Automate menu converts the Photo Browser or Organizer workspace individual pages of a PDF document to by click-dragging a marquee around the separate Photoshop Elements PSD files. thumbnails of the pictures. You will notice Multi-page documents In the feature’s dialog you can input the a shaded rectangle is displayed across Menu: – name and location of the source PDF the files as you draw the marquee. The Shortcut: – OS: Windows thumbnails included in this shaded area Version: 5 See also: Photo Creation format document (1), the destination directory for the converted files (4), page range (2), are included in the selection. Photoshop Elements 5.0 is the first version output resolution and color mode (3) as This new selection approach is in addition of the program to support documents well as the base name for the newly created to the shift-click and ctrl-click options containing more than one page. The multi- documents. already available (detailed below): page documents are saved in a new file format called the Photo Creations or PSE For opening a single page of a PDF To select a sequence of photos – Click format (1). The format is used for saving document as a new Elements document the first thumbnail and hold down the the multi-page output from Photo Creation (rather than converting multiple pages) Shift key whilst clicking on the last projects such as the Album Pages and use the File > Open command. Using this thumbnail in the series. Photo Layout options. approach to open a multi-page file will To choose several photos out of display the PDF Page Selector dialog (5) sequence – Click on the first thumbnail When a multi-page document is opened M complete with thumbnails of each page. and the hold down the Ctrl key whilst you into the Full Edit workspace the first page is displayed in the work area (2). The rest This feature is not included in version 4.0 select the other photos. of the pages are displayed as thumbnails or 5.0 of Photoshop Elements , where it’s (3) and are grouped together in a gray incorporated into the Open dialog box. frame in the Photo Bin (4). Clicking onto another page thumbnail in the Photo Bin area changes the display to the show the new page. The page currently selected is indicated in the Photo Bin by surrounding the page thumbnail with a blue highlight. Please purchase PDF Split-Merge on www.verypdf.com to remove this watermark. 5.0 A–Z 152 Photoshop Elements
- NAVIGATOR Nearest Neighbor 500% upsize nN nN Original ABCDEFGHIJKLMNOPQRSTU- VWXYZABCDEFGHIJKLM- NOPQRSTUVWXYZABCDEFGHIJKLMNOPQRSTUVWX- YZABCDEFGHIJKLMNOPQRSTUV Navigator Nearest Neighbor Menu: Editor: Window > Navigator WXYZABCDEFGHIJKLMNOPQRSTUVWXYZA- Shortcut: – OS: Mac, Windows interpolation Version: 1, 2, 3, 4, 5 See also: Zoom In/Out Menu: – BCDEFGHIJKLMNOPQRSTUVWX- The Navigator palette is a small scalable Shortcut: – OS: Mac, Windows See also: Interpolation, Image Size, Version: 1, 2, 3, 4, 5 YZABCDEFGHIJKLMNOPQRSTU- preview palette that shows the entire Bicubic interpolation image together with a highlighted VWXYZABCDEFGHIJKLMNOPQR rectangle (1) the size, scale and shape of the Nearest Neighbor is one of the interpolation methods that is available when resizing STUVWXYZABCDEFGHIJKLM- area currently displayed in the document pictures using the Image Size feature (1). window (2). NOPQRSTUVWXYZABCDEFGHI- This option provides the fastest and A new frame can be drawn (scaling the coarsest results and is only recommended JKLMNOPQRSTUVWXYZABCDEF- image window with it) by holding the for use with screen grabs or hard-edged GHIJKLMNOPQRSTUVWXYZABCDEFGHIJKLMN Command/Ctrl keys and making a new illustrations. It is not a method that works marquee. The frame can be dragged well with photographs. Instead, one of the OPQRSTUVWXYZABCDEFGHI- around the entire image with the Hand bicubic options should be used to resize JKLMNOPQRSTUVWXYZABCDEF- tool. these image types. The Zoom tools (3) can be clicked, the slider GHIJKLMNOPQRSTUVWXYZABC- can be dragged, or a figure can be entered DEFGHIJKLMNOPQRSTUVWXYZABCDEFGHIJ as a percentage. KLMNOPQRSTUVWXYZABCDEFGHIJKLMNOPQRSTU- VWXYZABCDEFGHIJKLM- NOPQRSTUVWXYZABCDEFGHI- N JKLMNOPQRSTUVWXYZABCDEF- GHIJKLMNOPQRSTUVWXYZABC- DEFGHIJKLMNOPQRSTUVWXYZABCDEFGH- IJKLMNOPQRSTUVWXYZABCDE- FGHIJKLMNOPQRSTUVWXYZAB- CDEFGHIJKLMNOPQRSTUVWX- YZABCDEFGHIJKLMNOPQRSTU- VWXYZABCDEFGHIJKLM- Please purchase PDF Split-Merge on www.verypdf.com to remove this watermark. www.ElementsA-Z.com 153
- nN NEON GLOW FILTER Editor Photo Browser New command Menu: Editor: File > New Photo Browser: File > New Shortcut: Ctrl/Cmd N (Blank File) OS: Mac, Windows Version: 1, 2, 3, 4, 5 See also: – The File > New option in both the Editor Neon Glow filter (1) and Organizer (2) workspaces provides New Layer button Menu: Editor: Filter > Artistic > Neon Glow the user with a starting point for a range of Menu: – Shortcut: – OS: Mac, Windows picture projects. The options are: Shortcut: – OS: Mac, Windows Version: 1, 2, 3, 4, 5 See also: Filters Version: 1, 2, 3, 4, 5 See also: Layer palette Blank File – This option creates an Elements The Neon Glow filter, as one of the Artistic picture from the settings selected in the The New Layer button located at the top of group of filters, colors the image with New dialog box. The box has sections for the Layers palette (1) creates a new blank foreground and background hues, adds a the image’s name, width, height, resolution, layer above the currently selected layer glow color and then softens the image. mode and background content. You can also when pressed. The new layer is transparent The filter contains two sliders and a color choose an existing template from a range of by default. The results are the same as if selection box. document types from the drop-down Preset the Layer > New > Layer menu item is menu. selected. The Glow Size setting (1) adjusts the position of the glow in the tonal range of Image from Clipboard – Once a picture, In versions 1.0 and 2.0 of Photoshop the picture. Low values place the glow in or selection, has been copied to memory Elements the New Layer button is located the shadow areas, higher settings move selecting this option automatically creates at the bottom of the Layers palette. the glow to the highlights. a new document of the correct size to accommodate the copied content and pastes The Glow Brightness slider (2) oscillates the image in as a new layer. the picture’s tinting between foreground, background and glow colors. Photomerge Panorama – This option takes you directly to the Photomerge Add The Glow Color (3) can be selected by Files dialog. Here you can use the Browse double-clicking (single-click) the color box button to locate the pictures that you want and selecting a new hue from the Color to include in the stitched panorama. After Picker dialog. clicking OK, the images are transferred Changing the foreground and background N to the Photomerge workspace, where the colors greatly alters the nature of the program arranges and blends the individual filtered results (4). images to form a single wide-angle photograph. To access this option from the Photo Browser, you must first have some New Brush Menu: – photos selected. Shortcut: B OS: Mac, Windows Creation (version 3/4)– This selection Version: 1, 2, 3, 4, 5 See also: Brush allows Windows users to jump from the To add a new brush to those listed in the editing program directly into the Photo Brush Preset palette display the pop-up Creation process. Selecting the option from palette from the options by pressing the the Editor workspace displays the Creation downwards arrow (1). Select a brush Setup window, whereas individual Photo from those listed and modify using the Creation projects can be selected from the various settings in the options bar. Press list provided in the Photo Browser: File > the sideways arrow (2) in the top right of New menu. In version 5.0 Photo Creation the Preset palette and select Save Brush projects are selected from their own menu from the menu. Enter the new brush name under the File heading (File > Create). and click OK. The new brush will be added to the bottom of the list in the palette. Please purchase PDF Split-Merge on www.verypdf.com to remove this watermark. 5.0 A–Z 154 Photoshop Elements
- NEW WINDOW nN Before New Window Normal blending mode Note Paper filter Menu: Editor: View > New Window for Menu: – Menu: Editor: Filter > Sketch > Note Paper Shortcut: – OS: Mac, Windows Shortcut: – OS: Mac, Windows Shortcut: – OS: Mac, Windows Version: 1, 2, 3, 4, 5 See also: – Version: 1, 2, 3, 4, 5 See also: Blending modes Version: 1, 2, 3, 4, 5 See also: Filters The New Window command creates The Normal blending mode is the default The Note Paper, as one of the Sketch group another image window for the current mode of newly created layers and newly of filters, redraws the photo as textured document. The two windows can be sized, selected brush tools. light and dark tones based on the current zoomed and moved independent of each When the top layer’s blend mode is set to selection of fore- and background colors. other. Normal and 100% opacity, no part of the The filter dialog contains three sliders This feature is most often used to help see bottom layer is visible and no blending that control the look and strength of the the effects of fine detail editing. The view of the two layers takes place. The picture effect. in one window is magnified (1) whilst the parts of the top layer are treated as opaque The Image Balance setting (1) adjusts other is kept so that the whole picture and therefore cover and obscure all image which areas are toned the foreground is displayed (2). Enhancing or editing detail beneath. color and which are converted to the activities are performed in the zoomed- background hue. Low values favor the in window and the changes checked in background color and high settings color the whole display view. more of the picture with the foreground color. The Graininess slider (2) determines the amount of grain that is added to the picture. The Relief slider (3) adjusts the strength of the simulated side lighting falling on N the paper surface. With higher values the texture is more pronounced. Changing the foreground and background colors away from their defaults greatly alters the nature of the filtered results (4). Please purchase PDF Split-Merge on www.verypdf.com to remove this watermark. www.ElementsA-Z.com 155
- oO OCEAN RIPPLE FILTER oO ABCDEFGHIJKLMNOPQRSTU- VWXYZABCDEFGHIJKLM- NOPQRSTUVWXYZABCDEFGHIJKLMNOPQRSTUVWX- Ocean Ripple filter Offline storage of files YZABCDEFGHIJKLMNOPQRSTUV Menu: Editor: Filter > Distort > Ocean Ripple Photo Browser: File > Get Photos > From Files and Menu: WXYZABCDEFGHIJKLMNOPQRSTUVWXYZA- Shortcut: – OS: Mac, Windows Version: 1, 2, 3, 4, 5 See also: Filters Folders Shortcut: – OS: Mac, Windows BCDEFGHIJKLMNOPQRSTUVWX- Version: 3, 4, 5 See also: Get Photos The Ocean Ripple filter, as one of the Distort YZABCDEFGHIJKLMNOPQRSTU- group of filters, applies a rippled distortion Most Elements users create their catalogs to the whole of the picture surface. In this (the thumbnail collections that you see in VWXYZABCDEFGHIJKLMNOPQR the Photo Browser workspace) from folders way it can create similar looking results STUVWXYZABCDEFGHIJKLM- to those obtained with the Glass or Ripple of images stored on their hard drives or filters. directly from their camera downloads but NOPQRSTUVWXYZABCDEFGHI- did you know that the program can also The filter contains two sliders controls. JKLMNOPQRSTUVWXYZABCDEF- generate catalogs from pictures that you The Ripple Size setting (1) adjusts the scale have stored on CD or DVD disks? GHIJKLMNOPQRSTUVWXYZABCDEFGHIJKLMN of the wave-like ripples that are added to When you File > Get Photos from your OPQRSTUVWXYZABCDEFGHI- the picture. Low values create smaller, less disk you have an option at the bottom dramatic, ripples. of the dialog (1) that allows you to keep JKLMNOPQRSTUVWXYZABCDEF- The Ripple Magnitude slider (2) determines the original pictures ‘Offline’ (on the CD GHIJKLMNOPQRSTUVWXYZABC- how far each ripple is distorted. High or DVD) but load proxy versions of the settings create a greater level of distortion photos into Elements to use for browsing, DEFGHIJKLMNOPQRSTUVWXYZABCDEFGHIJ in the final result. searching, tagging and organizing. If you KLMNOPQRSTUVWXYZABCDEFGHIJKLMNOPQRSTU- try to make any changes to the photo itself Elements is clever enough to ask you to VWXYZABCDEFGHIJKLM- insert the original disk so that the program NOPQRSTUVWXYZABCDEFGHI- can apply edits to the full version of the file. JKLMNOPQRSTUVWXYZABCDEF- O All offline files are indicated with a small GHIJKLMNOPQRSTUVWXYZABC- CD disk icon in the top left-hand corner of DEFGHIJKLMNOPQRSTUVWXYZABCDEFGH- the thumbnail (2). If you don’t select the Offline option in the IJKLMNOPQRSTUVWXYZABCDE- Get Photos dialog Elements will copy the FGHIJKLMNOPQRSTUVWXYZAB- photos from your disk to the hard drive and then create a catalog from this collection CDEFGHIJKLMNOPQRSTUVWX- of files. YZABCDEFGHIJKLMNOPQRSTU- VWXYZABCDEFGHIJKLM- Please purchase PDF Split-Merge on www.verypdf.com to remove this watermark. 5.0 A–Z 156 Photoshop Elements
- Before After Omni Lighting Effects OFFSET FILTER oO Offset filter Omni Lighting Effects One Photo Per Page Menu: Editor: Filter > Other > Offset Menu: Editor: Filter > Render > Lighting Effects Menu: Editor: File > Print Multiple Photos Shortcut: – OS: Mac, Windows Shortcut: – OS: Mac, Windows Photo Browser: File > Print Version: 1, 2, 3, 4, 5 See also: Filters Version: 1, 2, 3, 4, 5 See also: Lighting Effects Shortcut: Ctrl/Cmd P OS: Mac, Windows Version: 1, 2, 3, 4, 5 See also: Print The Offset filter, as one of the Other group Omni is one of the lighting types featured of filters, displaces the picture within the in the Lighting Effects filter. The Omni style The One Photo Per Page option located in image window. shines light in all directions, creating a the Print Multiple Photos dialog forces the bright center and then a sharp fall-off of feature to create pages with only one photo The filter contains two slider controls plus included. If the layout selected has space several options that determine how the light intensity. for more than one photo then selecting the offset areas are dealt with. This light type is great for highlighting a One Photo Per Page option will cause the The Horizontal and Vertical sliders (1) specific part of a scene whilst reducing the feature to repeat the photo in each space in adjusts how offset the picture is from its brightness of the rest of the picture. the template (1) depending on the layout, original position. The greater the values Move the light by click-dragging the light’s it also changes the total number of pages.. the larger the offset will be. center. You can decrease or increase the Deselecting the option will allow Elements to The Undefined Area options (2) determine size of the Omni light source by click- position other photos in these spaces (2). how the space left in the image window dragging one of the light handles. when the picture is repositioned will be Adjust the characteristics of the light treated. source by changing its properties. The Set to Background – This options fills brightness of the light is determined by the gap left in the image window with the the Exposure and Intensity sliders. current background color. Repeat Edge Pixels – The pixels at the edge Set to Background of the repositioned picture are repeated to the edge of the image window. O Wrap Around – The picture is wrapped around the image window so that the edges that are cropped due to the repositioning are added back into the picture on the opposite side. Online Help Menu: Editor: Help > Photoshop Elements Online Photo Browser: Help > Photoshop Help Online Shortcut: – OS: Mac, Windows Wrap Around Repeat Edge Pixels Version: 1, 2, 3, 4, 5 See also: Hints As well as the extensive help and tutorial resources that are contained within the Photoshop Elements program itself, extra tutorials, hints, tips and tricks can be found online. Select the Help > Photoshop Elements Online menu item (1) to take you to the Adobe web pages dedicated to your favorite photo-editing program. Please purchase PDF Split-Merge on www.verypdf.com to remove this watermark. www.ElementsA-Z.com 157
- oO ONLINE BACKUP Open Open As Menu: Editor: File > Open Menu: Editor: File > Open As Shortcut: Ctrl/Cmd O OS: Mac, Windows Shortcut: Alt Ctrl O OS: Windows Version: 1, 2, 3, 4, 5 See also: Open As, Open Recently Open, Open Recently Edited File Version: 1, 2, 3, 4, 5 See also: Edited file Working in much the same way as the Get Online Backup Photos > From Files and Folders option, On the odd occasion that a specific Windows file won’t open using the File Menu: Organizer: File > Backup Online Shortcut: – OS: Windows selecting File > Open presents you with > Open command you can try to open Version: 5 See also: Backup, Backup – multi-ses- the standard Windows (1) or Macintosh the file in a different format. Do this by sion, Backup – verify (2) File Browser. selecting the File > Open As option and A new online archive option is included From here you can navigate from drive then choosing the file you want to open (1). with version 5.0. Called Online Backup, to drive on your machine before locating The feature is used if a file has an incorrect the feature provides a way of storing a copy and opening the folder that contains file extension or no file extension at all. of important catalog files on a server on your pictures. You can refine the display After making this selection pick the desired the Internet. options by selecting the specific file type format (2) from the Open As pop-up menu, The service is provided by Iron Mountain. (file ending) to be displayed (3) and as we and click the Open button. This action After registering Elements users can have already noted you can also choose forces the program to ignore the file format backup their catalog to the secure server. the way to view the files. it has assumed the picture is saved in and In the Windows example, the thumbnail treat the image as if it is saved as the file view was selected so that it is possible type you have selected. to quickly flick through a folder full of If the picture still refuses to open, then pictures to locate the specific image you you may have selected a format that does are after. not match the file’s true format, or the file itself may have been damaged when being saved. O Opacity Menu: – Shortcut: – OS: Mac, Windows Version: 1, 2, 3, 4, 5 See also: Layer Opacity The Opacity setting can be adjusted for a range of tools and features in Photoshop Elements. It is a setting that controls the transparency of an object or layer. A value of 100% is completely opaque (not transparent at all), whereas a setting of 0% means that the layer or object is completely transparent. Brush opacity slider (1). Layer opacity slider (2). Please purchase PDF Split-Merge on www.verypdf.com to remove this watermark. 5.0 A–Z 158 Photoshop Elements
- OPEN FILE FOR EDITING oO Open File for Editing © www.ablestock.com 2005 Menu: Welcome Screen: Open File for Editing Shortcut: – OS: Mac Version: 3 See also: Open The Open File for Editing option located on the Welcome Screen in the Macintosh version of Elements 3.0 takes the user directly to the File Browser, from where individual images can be selected and opened. The option is the same as selecting File > Browse Folders from inside the Editor workspace. Optimization, web Menu: Editor: File > Save for Web Shortcut: Alt Shft Ctrl/Cmd S OS: Mac, Windows Version: 1, 2, 3, 4, 5 See also: JPEG, GIF The skill of making a highly visual site that downloads quickly is largely based on how well you optimize the pictures contained on the pages of the site. Options bar The process of shrinking your pictures for Menu: – web use involves two steps: Shortcut: – OS: Mac, Windows Version: 1, 2, 3, 4, 5 See also: Menu bar, Shortcuts bar • Firstly, the pixel dimensions of the image need to be reduced so that the image can Long bar beneath the shortcuts and menu be viewed without scrolling on a standard bars, which displays the various settings screen. This usually means ensuring that and options available for the tool that is the image will fit within a 600 × 480 pixel currently selected. space. • Secondly, the picture is compressed and Open Recently saved in a web-ready file format. There are two main choices here: GIF and JPEG. Edited File The best way to optimize your pictures for Menu: Editor: File > Open Recently Edited File Shortcut: – OS: Mac, Windows web use is via the Save for Web (Editor: File Version: 1, 2, 3, 4, 5 See also: Open, Open As > Save for Web) option in Elements. As you browse, open and edit various This feature provides before (1) and after pictures from your folders (2) previews of the compression process O Elements keeps track of the last as well as options for compression (3) and few files and lists them under the reducing the pixel dimensions of your File > Open Recently Edited Files menu pictures (4), all in the one dialog. item (1). Using the feature you can select the file This is a very handy feature as it means format, adjust compression settings (5), that you can return quickly to pictures examine the predicted file size and preview that you are working on without having the results live on screen. to navigate back to the specific folder where In the process of optimizing they are stored. your photos to suit web delivery By default Photoshop Elements lists the last the Save for Web feature strips 10 files edited. You can change the number any existing Metadata from of files kept on this menu with the ‘Recent files it produces. file list’ setting in the Edit > Preferences > Saving Files window (2). Don’t be tempted to list too many files as each additional listing uses more memory. Please purchase PDF Split-Merge on www.verypdf.com to remove this watermark. www.ElementsA-Z.com 159
- oO ORDER PRINTS PANE Order Prints pane Order Prints pane – Order Prints Menu: Photo Browser: Window > Order Prints Shortcut: – OS: Windows adding contacts Menu: Editor: File > Order Prints Photo Browser: File > Order Prints Order Prints, Menu: Photo Browser: Window > Order Prints Shortcut: – OS: Mac, Windows Version: 4, 5 See also: Order Prints pane adding contacts Shortcut: – OS: Windows Version: 1, 2, 3, 4, 5 See also: Print Version: 4, 5 See also: Order Prints, Order Prints pane Version 4.0 of Elements introduces a new Although many images you make, or streamline method of ordering online To add new contacts to the Order Prints enhance, with Elements will be printed prints to accompany the programs ability pane open the feature and press the Add right at your desktop, occasionally you to select, upload, print and deliver photos New Contact button. Insert the details in might want the option to output some online. the dialog displayed (1). prints on high quality photographic paper. Individual or multi-selected thumbnails are Alternatively you can import existing The Order Prints option (1), located in the dragged and dropped onto contact names contact details from the Contact Book by File menu, provides just this ability. in the Order Prints pane (1). The photos to selecting the Choosing Existing Contact Using the resources of kodakgallery.com print are associated with the contact name (2) button in the Add New Contacts dialog. in the USA, Europe and the UK, Elements and once the order is confirmed they are This action displays the Elements Contact users can upload copies of their favorite uploaded, printed and sent to the contact Book (3) from which you can select the images to the company’s site and have using the delivery details first entered details to add. them photographically printed in a range when creating the contact. of sizes (2). The finished prints are sent to To order prints using the feature start by you via the mail. ensuring that the pane is displayed by This service provides the convenience of selecting Organizer: Window > Order printing from your desktop with the image Prints. Next select or multi-select the and archival qualities of having your digital images from the Photo Browser (Organizer) pictures output using a photographic workspace to print. Drag the selected prints rather than inkjet process. to the Contact name or Target (2) in the pane. When the target changes color let go O of the mouse button to drop the pictures. And finally press the Confirm Order button (3) to process the order with the online print company. Order Prints pane – reviewing an order Menu: Photo Browser: Window > Order Prints Shortcut: – OS: Windows Version: 4, 5 See also: Order Prints, Order Prints pane To review and confirm a specific order open the Order Prints pane, select a contact name from those listed and then press the View Photos in Order button. Review the photos shown in the dialog and then press the Confirm Order button to place the online print order. Please purchase PDF Split-Merge on www.verypdf.com to remove this watermark. 5.0 A–Z 160 Photoshop Elements
- ORGANIZE BIN oO Before Organize Open Files Menu: Editor: File > Organize Open Files Shortcut: – OS: Windows Version: 3, 4, 5 See also: Get Photos If you have files that are open in the Editor workspace and are as yet unsaved, the Organize Open Files feature (1) will automatically display the Save As dialog Organize Bin with the ‘Include in the Organizer’ setting Overlay blending Menu: – Shortcut: – OS: Windows (2) selected. If a file has already been saved, it is added to the Organizer without the mode Version: 3, 4, 5 See also: Photo Browser Menu: – Save As dialog. When saved files are Shortcut: – OS: Mac, Windows The Organize Bin (1) stores the Tags, added to the thumbnail list in the Photo Version: 1, 2, 3, 4, 5 See also: Blending modes Properties, Order Prints and Collections Browser. panes and sits to the right of the main The Overlay blending mode is one of the thumbnail area in the Photo Browser work- group of Overlay modes which combines space. Like all the Bin features in Elements, the effects of both the Multiply and Screen the Organize Bin can be opened when you modes. Colors of the top layer overlay the need to access the panes it contains and bottom layer’s pixels but the highlight closed when you need to maximize the and shadow tones of the bottom layer are available workspace. preserved. There are three ways to open/close the There is no change when the bottom layer Organize Bin: is blended with a 50% gray top layer. 1. Select Photo Browser: Window > Organize Bin. 2. Click the Organize Bin toggle button (2) at the bottom right of the Photo Browser Screen. 3. Press the button on the bin’s left edge (3). Output Levels O Menu: Editor: Enhance > Adjust Lighting > Levels Shortcut: Ctrl/Cmd L OS: Mac, Windows Version: 1, 2, 3, 4, 5 See also: Levels The Output Levels controls (1) in the Levels dialog sit at the very bottom of the feature. By moving these black and white point sliders inwards, you are compressing the full tonal range of the picture. The result is a less contrasty photo. Such a change may be necessary to suit the requirements of a particular printer, or just to reduce the contrast of a picture taken on a sunny day. Please purchase PDF Split-Merge on www.verypdf.com to remove this watermark. www.ElementsA-Z.com 161
- oO ORGANIZER WORKSPACE Side feature to help choose the best shot (1) Menu bar Organizer workspace from a series of images taken of the same (2) Shortcuts bar Menu: – subject. (3) Timeline Shortcut: – OS: Windows (4) Date of images being shown Version: 3, 4, 5 See also: Editor Instant slide shows of whole collections, (5) Jump to Date View button or just those pictures selected from the (6) Collections tab The Organizer workspace, along with the browser, can be created and displayed using (7) Tags tab Quick Fix Editor, was first introduced in the View > Full Screen View feature. (8) Organize Bin hide/display toggle Elements 3.0 (Windows). button Simple editing tasks, such as the automatic Though the File Browser feature that adjustment of levels, contrast and/or (9) Thumbnail size was originally shipped with Elements (10) Thumbnails sharpness, along with simple orientation (11) Full Screen View (Photo Review) adequately provided a quick way to visually and crop changes can be performed O locate your images, it didn’t contain the feature directly from inside the browser with the (12) Show/Hide image properties range of Search, Tag and Display options Auto Fix feature. (13) Photo Browser arrangement that the Organizer boasts. (14) Map View Finding your favorite pictures has never Once the picture files have been imported been easier as you can search by date, (Organizer: File > Get Photos) into the caption, filename, history, media type, tag browser they can be viewed by date and color similarity (to already selected taken, their associated tags or collection photos). grouping, their folder location and even their geographic location (via Map View). Pairs of pictures can be viewed side by side with the View > Compare Photos Side by Please purchase PDF Split-Merge on www.verypdf.com to remove this watermark. 5.0 A–Z 162 Photoshop Elements
- Before PAGE SETUP PQ After pq ABCDEFGHIJKLMNOPQRSTU- VWXYZABCDEFGHIJKLM- NOPQRSTUVWXYZABCDEFGHIJKLMNOPQRSTUVWX- YZABCDEFGHIJKLMNOPQRSTUV Page Setup Paint Bucket tool Menu: Editor: File > Page Setup Menu: – WXYZABCDEFGHIJKLMNOPQRSTUVWXYZA- Photo Browser: File > Page Setup Shortcut: Shft Ctrl/Cmd P OS: Mac, Windows Shortcut: K Version: 1, 2, 3, 4, 5 OS: Mac, Windows See also: Magic Wand BCDEFGHIJKLMNOPQRSTUVWX- Version: 1, 2, 3, 4, 5 See also: Print The Paint Bucket tool is grouped with the YZABCDEFGHIJKLMNOPQRSTU- The Page Setup dialog, in conjunction with painting and drawing tools in the Elements the Print and the Print Multiple Photos toolbar. VWXYZABCDEFGHIJKLMNOPQR dialogs, controls all the printing options from Photoshop Elements. The feature combines the selecting prowess STUVWXYZABCDEFGHIJKLM- of the Magic Wand and the coloring Here you can change the orientation of the abilities of the Fill command to create a NOPQRSTUVWXYZABCDEFGHI- paper that you are printing on – Portrait is tool that fills all pixels of a similar color (1) JKLMNOPQRSTUVWXYZABCDEF- vertical and Landscape is horizontal (1). with the current foreground color (2). GHIJKLMNOPQRSTUVWXYZABCDEFGHIJKLMN Page Setup also provides options to input If the Contiguous option is selected then the values for the paper Size (2) and paper pixels that will be filled must be adjacent to OPQRSTUVWXYZABCDEFGHI- Source (3), which are both determined by one another. How similar in color and tone JKLMNOPQRSTUVWXYZABCDEF- the printer that is currently selected. the pixels have to be before being filled is If you wish to change printers, then based on the Tolerance setting. GHIJKLMNOPQRSTUVWXYZABC- clicking the Printer button (4) will take To ensure a realistic DEFGHIJKLMNOPQRSTUVWXYZABCDEFGHIJ you to a second dialog, where you can substitution of color select another printer that is installed and try using the tool in the KLMNOPQRSTUVWXYZABCDEFGHIJKLMNOPQRSTU- connected to your computer. Color mode (3) as this will VWXYZABCDEFGHIJKLM- The Page Setup dialog can also be accessed maintain the texture, NOPQRSTUVWXYZABCDEFGHI- via the button at the bottom of the Print shadow and details of the Multiple or Print Selected Photos (5). original picture. JKLMNOPQRSTUVWXYZABCDEF- GHIJKLMNOPQRSTUVWXYZABC- PQ DEFGHIJKLMNOPQRSTUVWXYZABCDEFGH- IJKLMNOPQRSTUVWXYZABCDE- FGHIJKLMNOPQRSTUVWXYZAB- CDEFGHIJKLMNOPQRSTUVWX- YZABCDEFGHIJKLMNOPQRSTU- VWXYZABCDEFGHIJKLM- Please purchase PDF Split-Merge on www.verypdf.com to remove this watermark. www.ElementsA-Z.com 163
- PQ PAINT DAUBS FILTER Paint Daubs filter Painting tools Menu: Editor: Filter > Artistic > Paint Daubs Menu: – Shortcut: – OS: Mac, Windows Shortcut: B OS: Mac, Windows Version: 1, 2, 3, 4, 5 See also: Filters Version: 1, 2, 3, 4, 5 See also: Brush The Paint Daubs filter, as one of the Artistic Although many people will employ group of filters, applies a painterly effect Elements to enhance images captured to the whole of the picture surface. In using a digital camera, some users make the process the fine detail of the photo is pictures from scratch using the program’s eclipsed by large areas of painted color. painting and drawing tools. Illustrators, The filter contains two sliders controls and in particular, generate their images with a Brush Type menu. the aid of tools such as the Paint Bucket, Airbrush and Pencil. This is not to say that The Brush Size setting (1) adjusts the scale it is not possible to use drawing or painting of the painted areas. Low values create tools on digital photographs. In fact, the smaller areas with finer detail. judicious use of tools like the Brush can Palette Bin The Sharpness slider (2) determines how Menu: Editor: Window > Palette Bin enhance detail and provide a real sense Shortcut: F7 OS: Mac, Windows much of the original detail is maintained in of drama in your images. All the painting Palettes, Organize Bin, the painting process. High settings create a Version: 1, 2, 3, 4, 5 See also: and drawing tools are grouped in the one Artwork and Effects palette greater level of detail and low values create section of the program’s toolbar for easy broad areas of smooth color. The Palette Bin (1) stores the Elements access. palettes and sits to the right of the main The Brush Type menu (3) contains a list screen in the Editor workspace. of different styles of brushes. Changing Like all the Bin features in Elements, the brush types can alter the final filter result Palette Bin can be opened when you need greatly. to access the palettes it contains and closed when you need to maximize the available workspace. The palettes can be dragged from the bin into the main workspace (and PQ back again) by click-dragging the palette’s title bar. There are four ways to open/close the Palette Bin: 1. Select Editor: Window > Palette Bin. 2. Click the Palette Bin toggle button at the bottom right of the Editor screen (version 3/4 only). 3. Press the button (2) on the bin’s left edge. 4. You can also partially close or open the bin by dragging the resize bar (2). Please purchase PDF Split-Merge on www.verypdf.com to remove this watermark. 5.0 A–Z 164 Photoshop Elements
- PALETTE KNIFE FILTER PQ Palette Knife filter Palette Well Palettes Menu: Editor: Filter > Artistic > Palette Knife Menu: – Menu: Editor: Window > Shortcut: – OS: Mac, Windows Shortcut: – OS: Mac, Windows Shortcut: F7 (Palette Bin) OS: Mac, Windows Version: 1, 2, 3, 4, 5 See also: Filters Version: 1, 2 See also: Palette Bin Version: 1, 2, 3, 4, 5 See also: Palette Bin The Palette Knife filter, as one of the In versions 1.0 and 2.0 of Elements open A palette is a window that contains Artistic group of filters, simulates the look palettes could be dragged to the Palette details and information that are used for of a picture created by applying thick broad Well space in the options bar to save work- the alteration of image characteristics. areas of paint with a palette knife. space area. This action reduces the palette Photoshop Elements contains the following The filter contains three slider controls. to a tab in the well. To view the palette palettes: Color Swatches, Histogram, How click onto the Tab heading, to reinstate the To, Info, Layers, Navigator, Styles and The Stroke Size setting (1) adjusts the palette to the workspace click-drag the tab Effects and Undo History. strength of the effect and the size of the out of the well. broad areas of paint. Low values retain The palettes are displayed and hidden by more of the detail of the original picture. The Palette Well feature has now been selecting them from the Window menu replaced by the Palette Bin. (1). They can be grouped together in the The Stroke Detail slider (2) determines how Palette Bin (2), or dragged into the main coarsely the color is applied. Low values workspace (3) . create a more broken up result. The Softness control (3) alters the sharpness of the stroke’s edge. A high setting produces strokes with a softer edge. PQ Please purchase PDF Split-Merge on www.verypdf.com to remove this watermark. www.ElementsA-Z.com 165
- PQ PANORAMAS, CREATING Paragraph text Menu: – Shortcut: T OS: Windows Version: 4, 5 See also: Type tool In previous versions of Elements text was entered one line at a time. The user needed to press the Enter key at the end of each line in order to start a new line of text underneath. In version 4.0 this way of working is no longer necessary. Now Panoramas, creating Capture source images text is entered in Paragraph mode which will automatically wrap when the cursor Menu: – Shortcut: – OS: Mac, Windows reaches the text box edge. Version: 1, 2, 3, 4, 5 See also: Photomerge To create a paragraph, select the Type The process of creating a wide-angle tool and then click-drag a text box on picture, or panorama, using the Elements the surface of the picture. Automatically Photomerge feature is broken into three Elements positions a cursor inside the different stages: box and creates a new layer to hold the contents. Typing inside the box will add 1. Capturing the source photos Shoot text that automatically wraps when it a range of images whilst gradually reaches the box edge. When you have rotating the camera so that each Stitch photos completed entering text, either click the photograph overlaps the next. ‘tick’ button in the options bar, or press 2. Stitching images using the Control + Enter keys. Photomerge Import the pictures into You can resize or even change the shape Photomerge and use its automated of the box at any time by selecting a Type process to position, match and stitch tool and then clicking onto the area where PQ the edge details of the separate image the paragraph text has been entered. This files to create a new single panoramic action will cause the original text box to picture. display. The box can then be resized by 3. Producing the panorama Make moving the cursor over one of the handles final editing and enhancement (small boxes at the corners/edges) and changes on the finished panoramic Produce panorama click-dragging the text box marquee to photo before printing the picture. a new position. The text inside the box will automatically rewrap to suit the new dimensions. Please purchase PDF Split-Merge on www.verypdf.com to remove this watermark. 5.0 A–Z 166 Photoshop Elements
- PASTE COMMAND After Fill Layer PQ After Fill Selection Paste command Menu: Editor: Edit > Paste Shortcut: Ctrl/Cmd V OS: Mac, Windows Version: 1, 2, 3, 4, 5 See also: Paste Into Selection The Edit > Paste command pastes the current contents of the computer’s Clipboard as a new layer in the open Photoshop Elements document. This menu option is grayed out (not available) if there is currently nothing copied to the Clipboard. Patchwork filter Pattern, Fill Layers Menu: Editor: Filter > Texture > Patchwork Menu: Editor: Edit > Fill Layer or Fill Selection Shortcut: – OS: Mac, Windows Shortcut: – OS: Mac, Windows Version: 1, 2, 3, 4, 5 See also: Filters See also: Fill, Define Version: 1, 2, 3, 4, 5 Pattern from Selection The Patchwork filter, as one of the Texture group of filters, simulates the look of the The Edit > Fill Layer command is generally surface of a patchwork quilt. In the process used for filling layers, or active selections, the picture is broken up into a series of with solid colors, but the feature can also squares. be used for applying patterns to layers or selections. The filter contains two sliders controls. After selecting Edit > Fill, choose Pattern as The Square Size setting (1) adjusts the the option from the Use menu (1) and then size of each square. The Relief slider (2) select a pattern from the Custom Pattern determines the degree of shadow that palette (2). is applied to the texture squares. Low values have less shadow and therefore the To fill a layer, select the layer first and appearance of lower relief. then choose Edit > Fill Layer. To restrict the pattern fill to the extent of a selection, create the selection first and then choose Paste Into Selection Edit > Fill Selection. Menu: Editor: Edit > Paste Into Selection Shortcut: Shft Ctrl/Cmd V OS: Mac, Windows Use the Define Pattern feature to produce Version: 1, 2, 3, 4, 5 See also: Paste custom patterns to use with the Fill command. The Edit > Paste Into Selection command pastes the contents of the Clipboard into the active selection of the current Photoshop Elements document. The pasted picture part is inserted into the selected area and the boundaries of PQ the inserted picture are highlighted by a selection marquee (marching ants). The selection can be moved and transformed within the boundaries of the insertion area whilst the selection remains active. Once the selection is deselected, the inserted picture becomes part of the layer it was passed into and no editing of this type is available. Please purchase PDF Split-Merge on www.verypdf.com to remove this watermark. www.ElementsA-Z.com 167
CÓ THỂ BẠN MUỐN DOWNLOAD
-
Adobe Photoshop Elements 5.0 A–Z Tools and features illustrated ready reference- P1
 50 p |
  242
|
242
|  56
56
-
Adobe Photoshop Elements 5.0 A–Z Tools and features illustrated ready reference- P2
50 p | 143
| 36
-
Adobe Photoshop Elements 5.0 A–Z Tools and features illustrated ready reference- P3
50 p | 128
| 32
-
Adobe Photoshop Elements 5.0 A–Z Tools and features illustrated ready reference- P6
7 p | 172
| 18
-
Adobe Photoshop Elements 5.0 A–Z Tools and features illustrated ready reference- P5
50 p | 93
| 16


Chịu trách nhiệm nội dung:
Nguyễn Công Hà - Giám đốc Công ty TNHH TÀI LIỆU TRỰC TUYẾN VI NA
LIÊN HỆ
Địa chỉ: P402, 54A Nơ Trang Long, Phường 14, Q.Bình Thạnh, TP.HCM
Hotline: 093 303 0098
Email: support@tailieu.vn
Giấy phép Mạng Xã Hội số: 670/GP-BTTTT cấp ngày 30/11/2015 Copyright © 2022-2032 TaiLieu.VN. All rights reserved.

